 MemoToMIDI
MemoToMIDI — User Manual
Last updated: 2026-08-30 · Applies to TestFlight Build 10
Turn what you play into editable MIDI, on your iPhone, iPad, or Mac.
This manual covers all four surfaces: the iPhone and iPad app, the Mac app (§15), and the MemoToMIDI plugin (Audio Unit) on both platforms (§14). Where a surface differs, it is called out in place.
The beta you are running today is the iPhone and iPad app and its plugin. The Mac app and the Mac plugin ship alongside them at release.
1. Introduction
MemoToMIDI turns a recording of your playing into editable MIDI — the note data your music software reads. Play a riff, a melody, a chord part, or hum a line, and the app detects the notes and presents them on a piano roll to clean up and export.
Instrument doesn’t matter: guitar, bass, piano, voice, strings, winds, a synth line. If it has pitch, the app will try to transcribe it.
Where it runs. There are four places you can use MemoToMIDI, and they are not all the same tool:
- The iPhone and iPad app — the full thing. Record, import, transcribe, edit, and export. Most of this manual describes it.
- The plugin on iPhone and iPad — capture from a track inside your music app and get MIDI back out without switching apps (§14).
- The Mac app — no recording; you drop in audio files you already have, and it transcribes and keeps them in an Idea Library (§15).
- The plugin on the Mac — the same capture-in-place idea, in Logic and other Audio Unit hosts, with the MIDI dragged straight onto a track (§14).
One purchase covers all of them.
What you can do with it
- Capture MIDI without a MIDI controller, or a computer.
- Get a rough transcription automatically, then correct it by hand.
- Send the result to Logic, Ableton, GarageBand, or any app that opens a MIDI file.
The workflow. Every project follows the same four steps:
- Record or import — record into the app, or bring in an audio file you already have.
- Transcribe — when a recording stops, the app analyzes the audio and lays the notes onto a piano roll automatically. From there you adjust the detection to get the most faithful version before you start editing.
- Edit — delete or add notes, re-pitch, dynamics, quantize, etc.
- Export — save the result as a standard MIDI file.
The transcription usually isn’t perfect. Auto-detection gets you most of the way, and then you tighten it up after. You could polish it in your DAW instead, but MemoToMIDI keeps everything lined up right where you recorded it — making it easy to compare with your ears and tweak anything that doesn’t sound quite right on your phone.
The rest of this manual covers each step and the tools around them: the tuner, the click track, your recording library, and settings.
MemoToMIDI reads pitched playing, not drums, and it runs entirely on your device. There’s no account and no server: your audio is never sent anywhere, and transcription works offline. The one thing that leaves your iPhone or iPad is a finished
.midfile, and only when you ask for it — Add to Song puts it in your own iCloud Drive so your other devices can reach it.
2. Getting started
Installing the beta
MemoToMIDI is currently distributed through TestFlight, Apple’s app for pre-release builds.
- Install TestFlight from the App Store if you don’t have it.
- Open the invitation link you were sent, or enter your invite code in TestFlight.
- Tap Install next to MemoToMIDI, then Open.
You’ll need an iPhone running iOS 17 or later, or an iPad running iPadOS 17 or later. Once MemoToMIDI reaches the App Store you’ll install it the usual way. The Mac app and Mac plugin need macOS 14 or later, and arrive at release rather than in this beta.
First launch
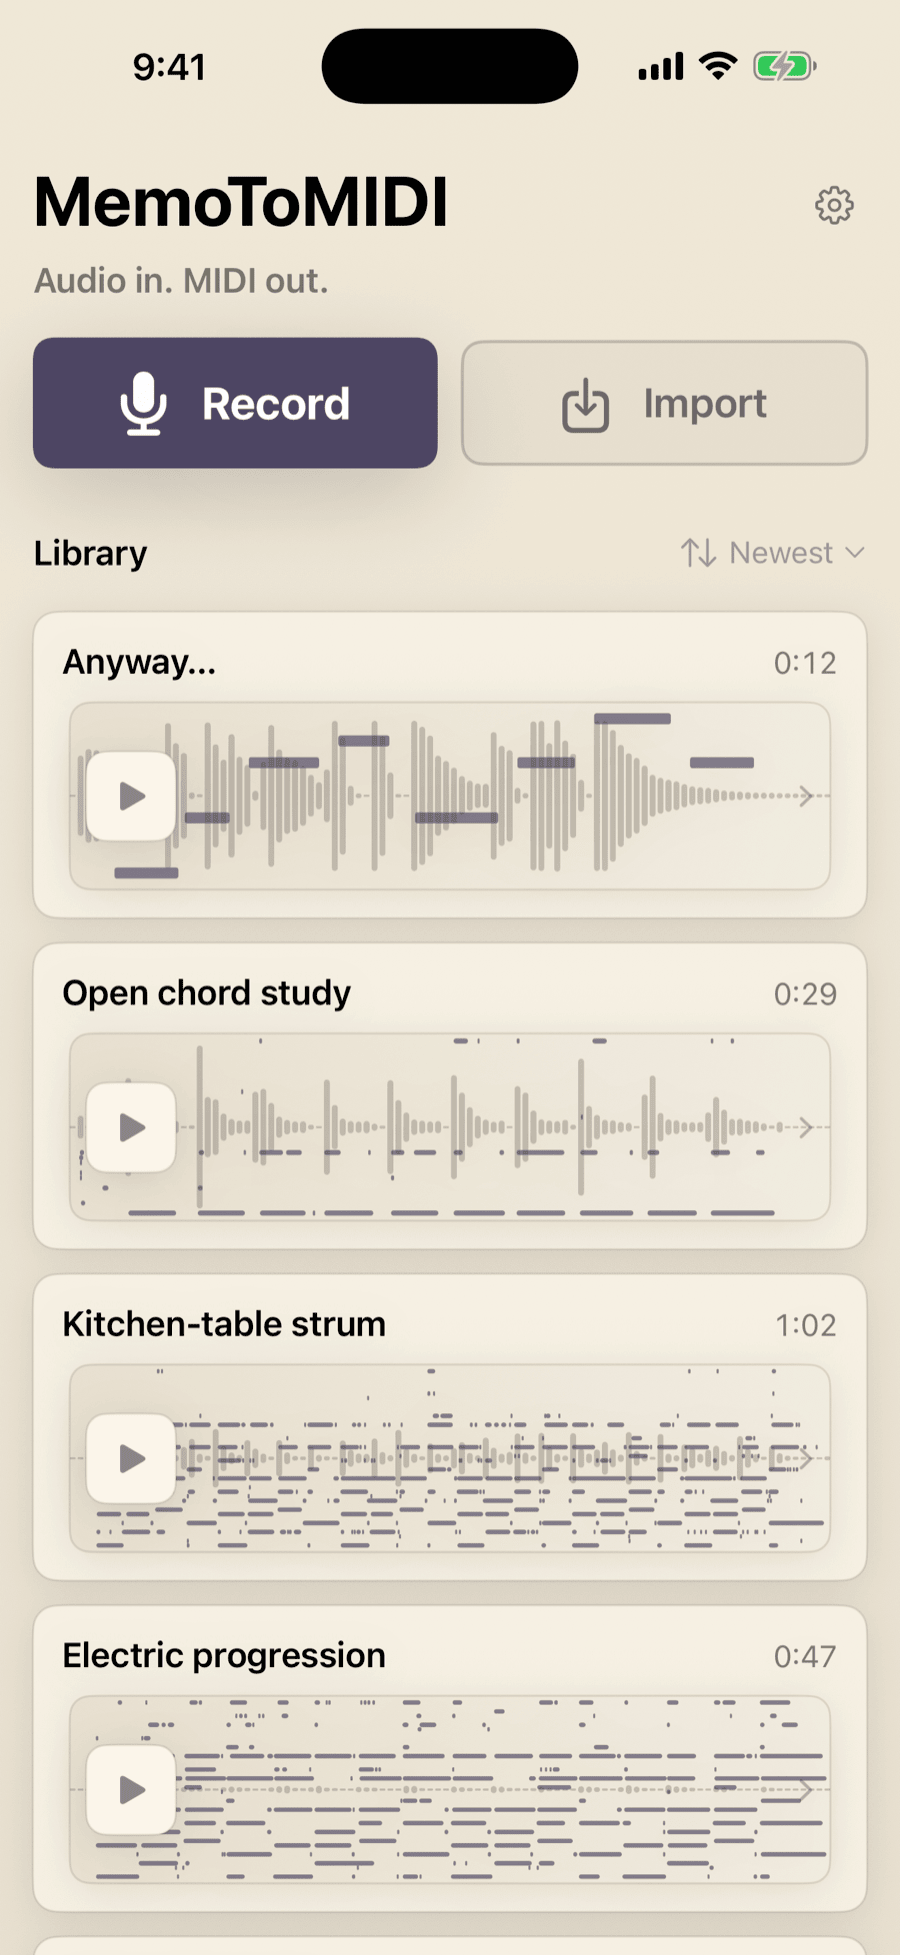
The app opens to your Library — the home screen. It’s empty until you record or import. Two buttons:
- Record (microphone icon) — capture audio with your device’s mic.
- Import (download icon) — bring in an audio file you already have.
Microphone permission
The first time you tap Record, iOS asks to use the microphone. Tap Allow — the app can’t record without it. If you decline, you can turn it back on later in the iOS Settings app under MemoToMIDI; if the app finds the mic blocked, it shows a shortcut to that screen.
Finding your way around
The app has four stops:
- Library — your saved takes; where you start and return.
- Record / Import — getting audio in.
- Detection — where the app transcribes the audio and you edit the notes on a piano roll.
- Export — turning the finished notes into a MIDI file.
3. Recording audio
To record, open the Library and tap Record.
Before you record
With Free selected, the ready screen’s microphone artwork gently breathes and reacts to sound while the mic is primed. Tap the artwork to shuffle it. This is visual only: its motion does not mean recording has started, it does not affect the audio or transcription, and nothing is saved until you press Record. If microphone access has not been decided yet, the app asks when you press Record or open Tuner; a granted Record request continues straight into the take.
Choose one timing workflow before you begin:
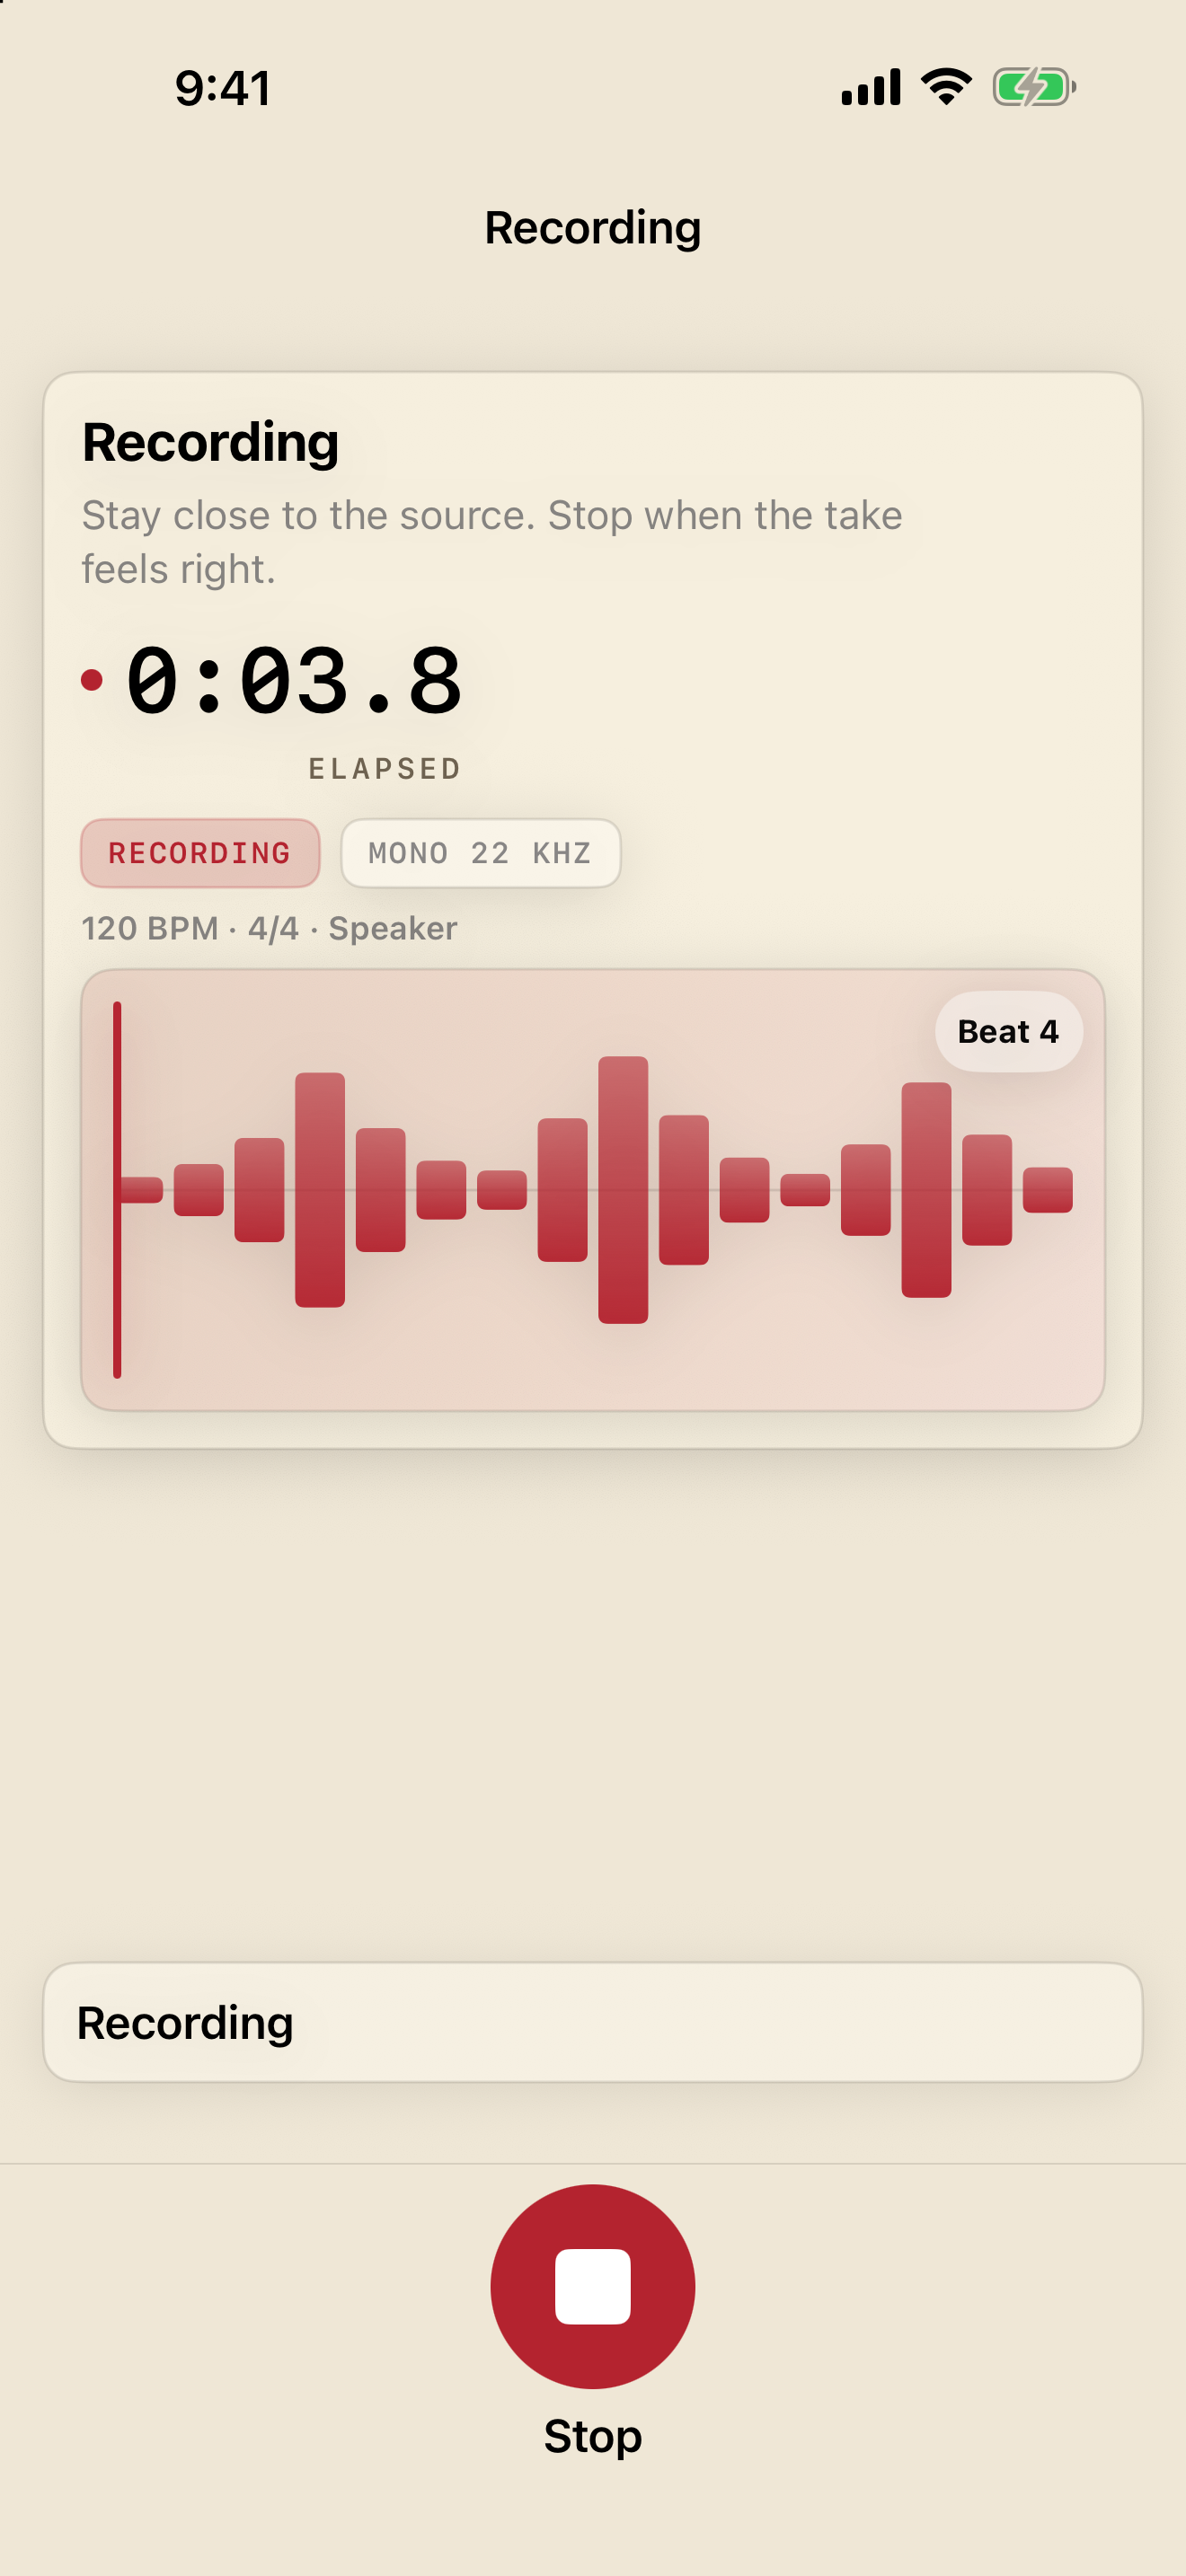
- Click — the recommended default. Its tempo, beats-per-bar, and audible or visual output controls appear directly on the page.
- Free — record without a click and map the beat later in Groove. Recording a counted one-bar lead-in makes Beat 1 easier to place later.
The screen also includes a compact Tuner — see Tuner.
Recording
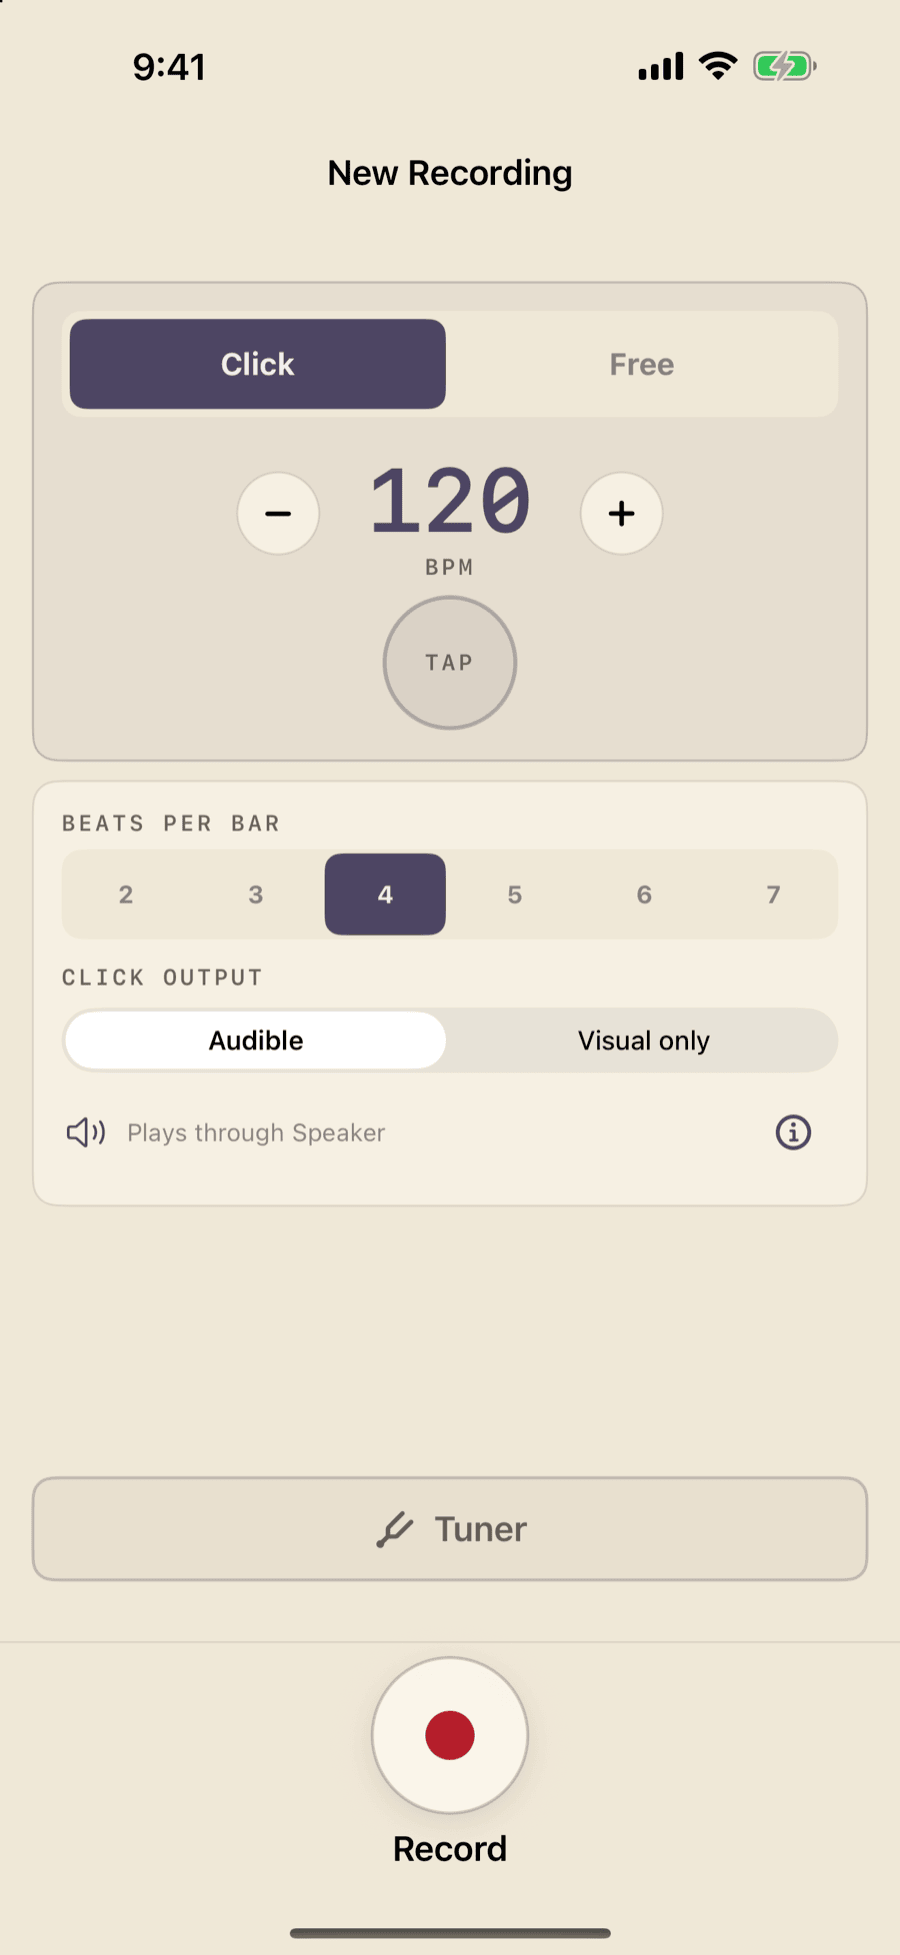
- Tap Record. Recording begins immediately; there is no automatic count-in. With Click selected, audio capture and the click start together, so you can listen through as many lead-in bars as you need before playing.
- As you play, the screen shows a running timer and a live waveform. Recording is mono — point your device at the source and keep a steady distance. Closer is generally better, but distance isn’t as important as a quiet room and a clean performance.
- Tap Stop when you’re done.
There’s no length limit, but short, focused takes transcribe more cleanly than long ones. On either device, keep the built-in microphone pointed toward the source; a connected microphone works too.
After you stop
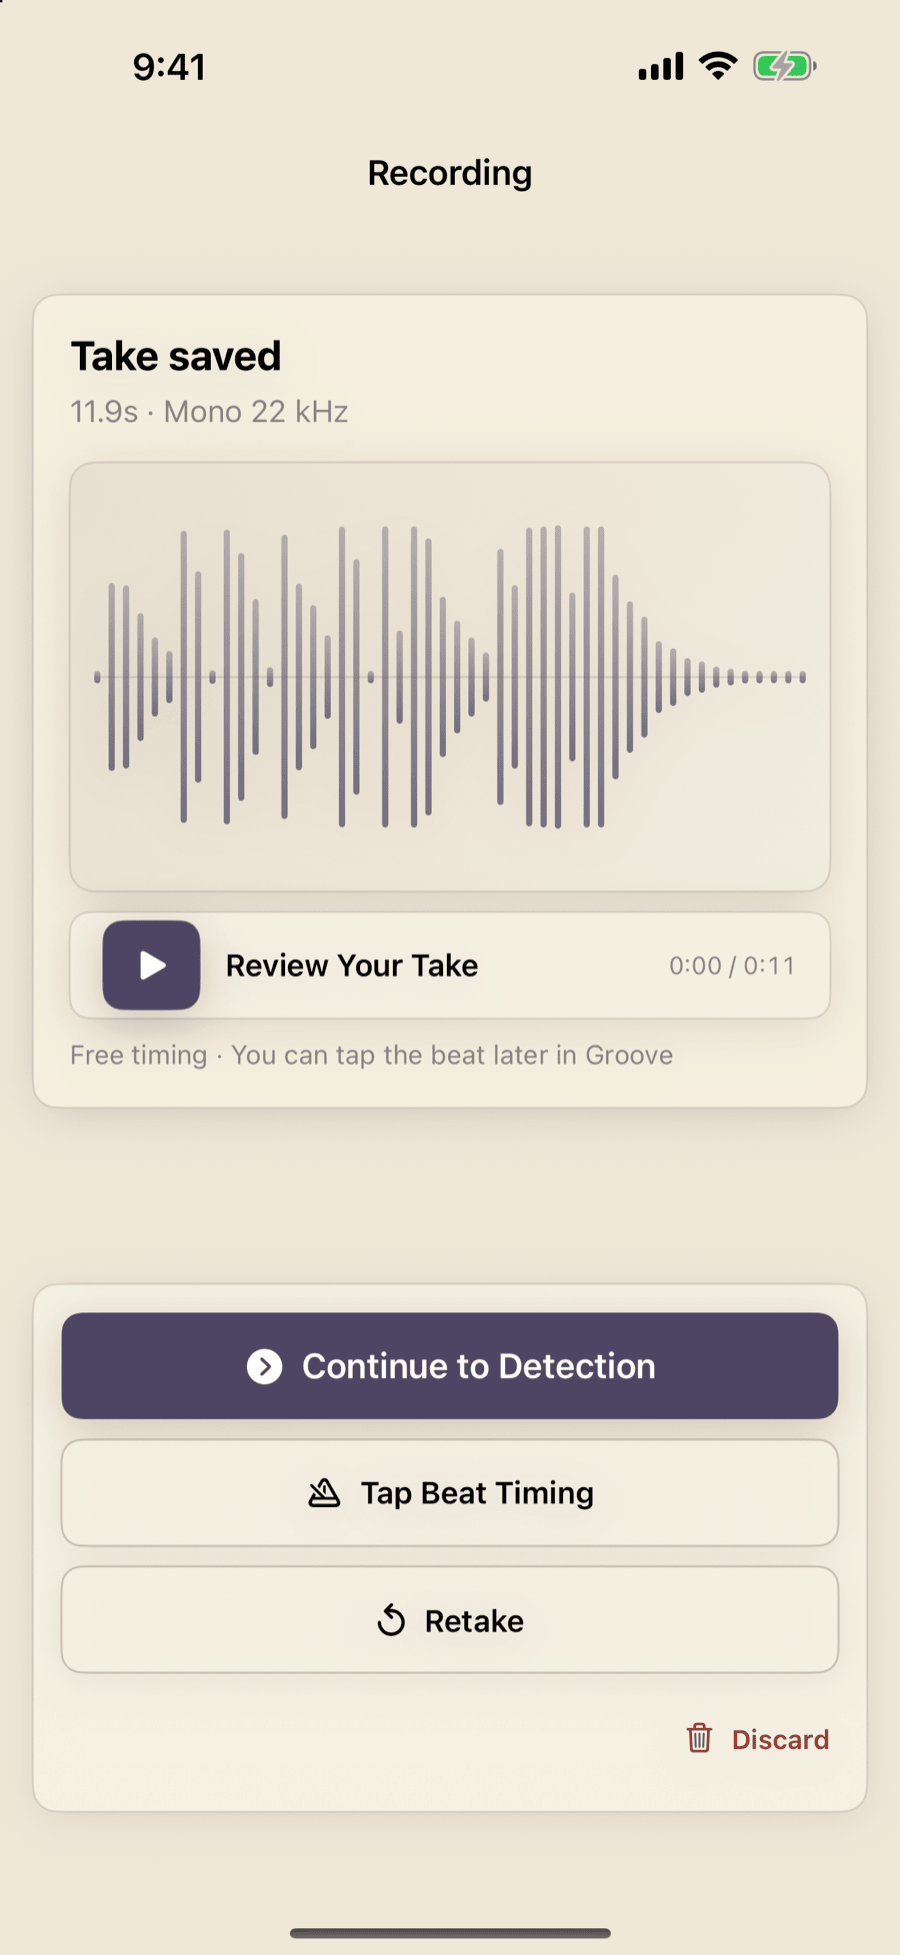
The take is saved automatically as a draft. The screen shows Take saved with a Review Your Take strip; tap play to hear it back. Then choose:
- Continue to Detection — opens the take in Detection, where it’s transcribed and you edit the notes.
- Tap Beat Timing (Free takes only) — tap along to the saved take now to map its beat, then continue to Detection. Click takes already have their beat map, so they do not show this action.
- Retake — returns to Ready to record with the same setup and waits for a deliberate Record tap. The saved original remains safe until its replacement is successfully saved.
- Discard — asks for confirmation, then deletes the draft and returns to the Library.
4. Tuner
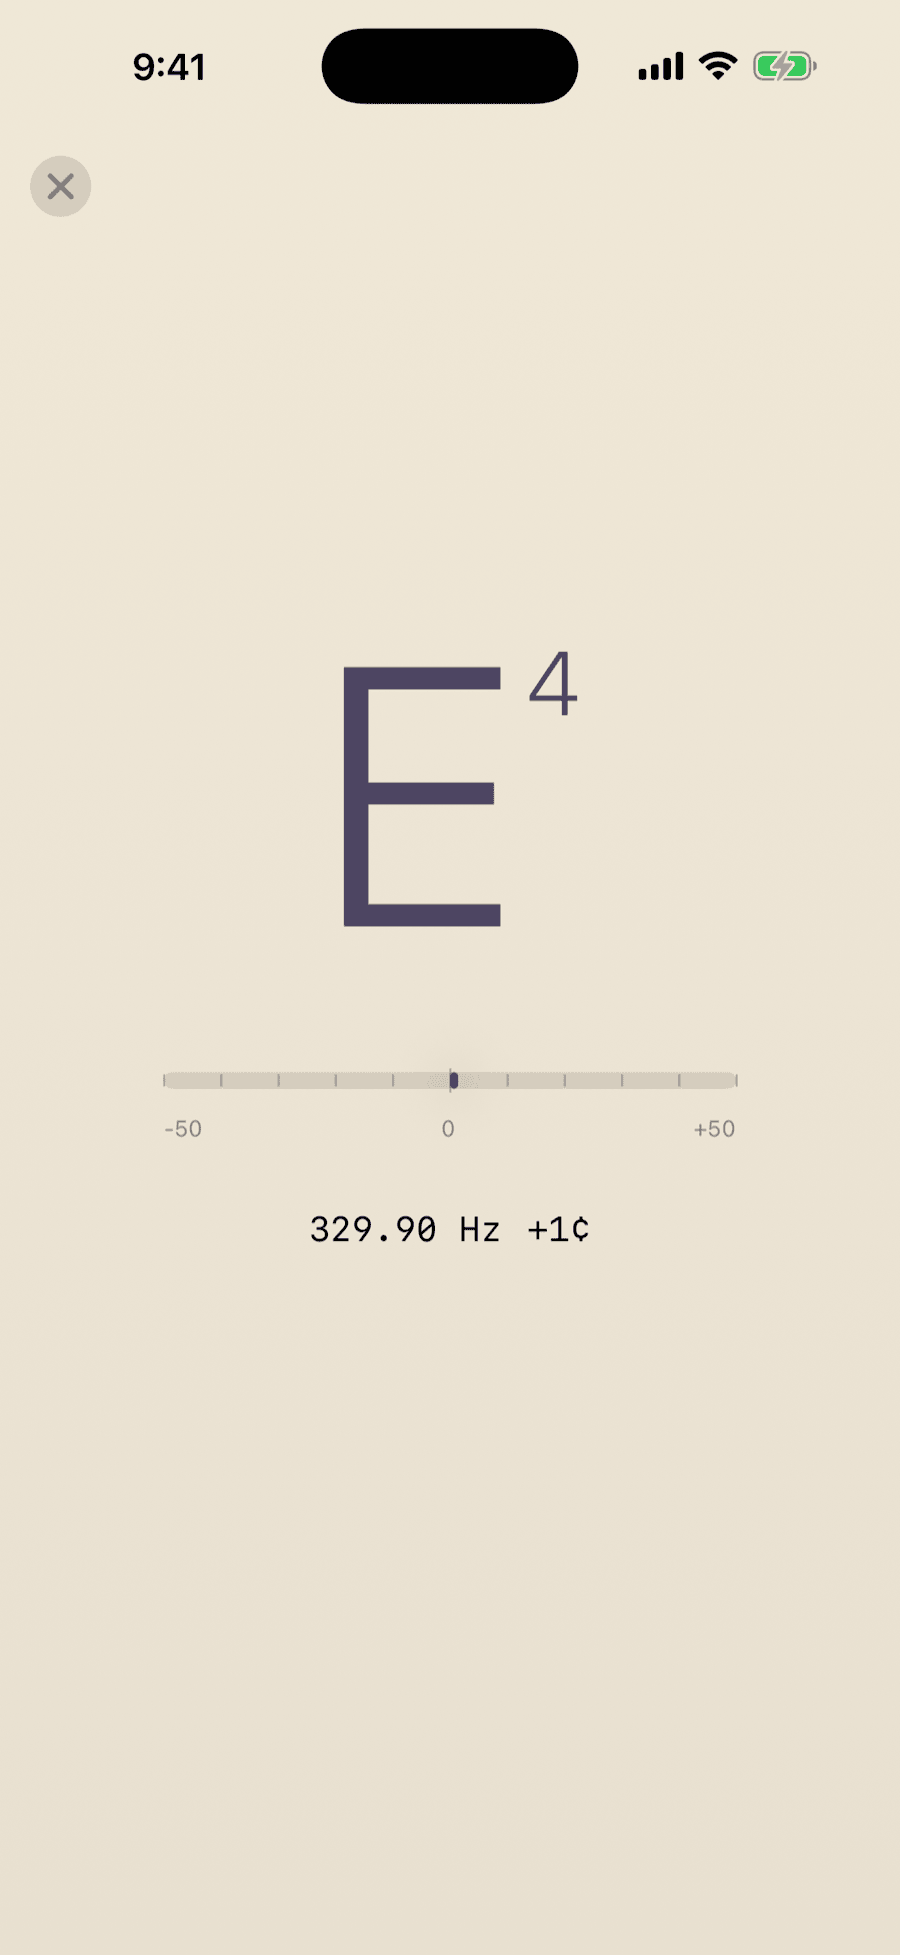
A built-in tuner gets you in tune before you record. On the Record screen, tap Tuner; it uses the same microphone permission as recording.
Play a single note and it names the nearest note, with a cents bar and a readout showing how far sharp or flat you are. The display lights up when you’re in tune. It’s chromatic, so it works for any instrument. Tap the ✕ to close.
5. Tempo & beat-tap
Knowing where the beats fall lets MemoToMIDI line your notes up to bars later. You can set it up two ways: play along to a click track while you record, or tap the beat on a take you’ve already recorded.
Recording to a click
On the Record screen, select Click to play along to a metronome. Click is the default for a fresh setup, and the app remembers your later Click/Free choice:
- Tap — tap this button in time a few times to set the tempo from your tapping.
- A BPM readout with −/+ buttons to nudge the tempo a beat at a time.
- Beats per bar — 2 through 7 (4 is the usual choice).
- Click output — choose Audible or Visual only. Audible shows the current speaker, headphone, or Bluetooth route. Visual only uses the on-screen pulse without playing a click through that route.
Because the app knows the click’s timing, your bars are already mapped. Audible click takes show a compact beat indicator while the recorded waveform and timer remain primary; Visual only uses the larger visual beat.
The audible click won’t become MIDI notes, but your microphone may still hear it in the recorded audio. Use headphones or Visual only when bleed matters.
For a free take, select Free and consider counting one bar before you start
playing. Keeping that 1 2 3 4 lead-in in the recording makes Beat 1 easier to
identify when you set Beat Timing later.
Setting Beat Timing afterwards
For a take recorded without a click, choose Tap Beat Timing from the saved-take review or open Set Beat Timing in Groove. Tap the steady beat you would count — not every note or subdivision. The screen moves through three stages:
- Prepare. The full-take waveform is visible before playback. Start on the first beat of a bar if you can, then tap Start Tapping for a visual 3-2-1.
- Capture. Audio starts from the beginning. Tap anywhere on the screen — the waveform included — in time with the beat, through to the end; raw tap marks and a compact captured-tap count appear on the waveform. An occasional missed beat is okay. Restart discards this draft and begins again from zero.
- Review. MemoToMIDI shows the cleaned beats it will use, including any distinctly marked stray taps it ignored. Use Play with Beat Clicks to listen, tap the waveform to choose a later review start, choose Use All Taps when an ignored tap belongs in the beat sequence, or open Adjust Beats to fix individual markers.
Adjusting individual beats
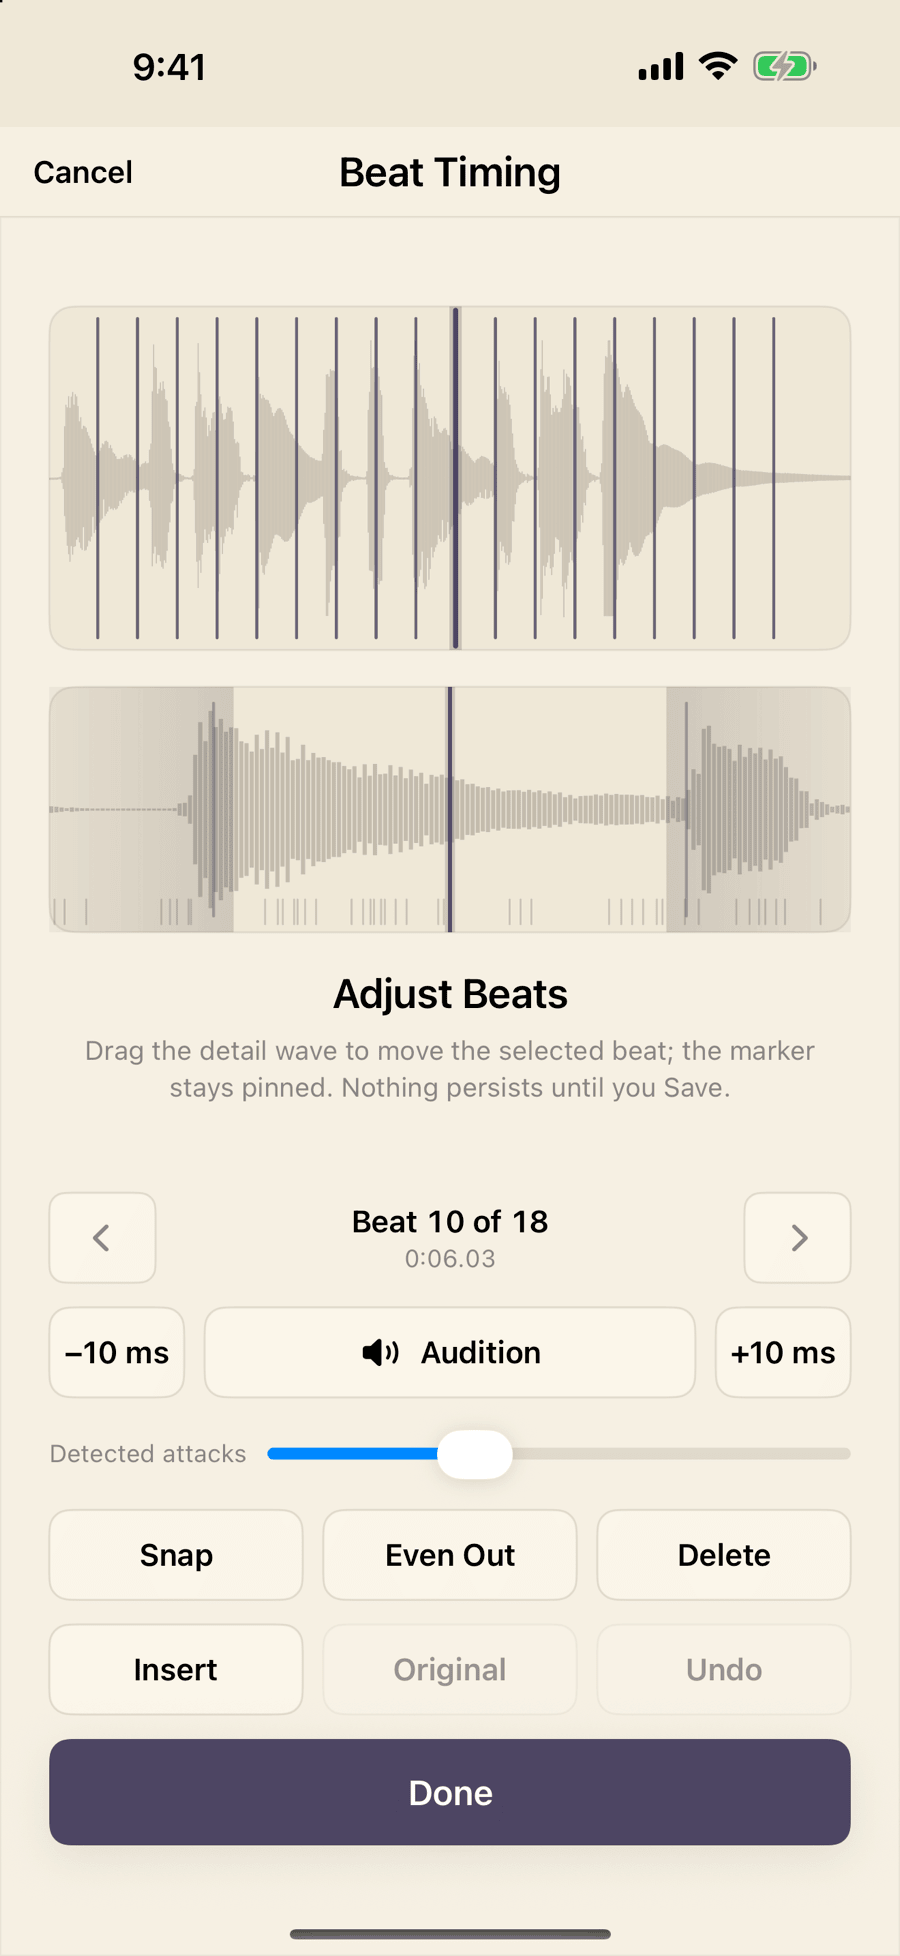
Adjust Beats (in review) opens a zoomed detail lane below the full-take waveform. Tap the overview to select the beat nearest your tap, or step through beats with the chevrons — or swipe the detail lane with two fingers (left for the next beat, right for the previous).
- Move. Drag the detail lane: the selected marker stays pinned at the center while the waveform scrubs beneath it. Release wherever it sounds right — a short window then plays with the click exactly on the marker. Faint ticks mark detected attacks; the drag eases onto them as you pass (you can always push through), and Snap jumps the beat onto the nearest one — it’s available only when a tick is close by, so a dimmed Snap means there’s nothing nearby to snap to. The Detected attacks slider sets how many attacks count: slide left to keep only the strongest hits, right to include every detected attack — and keep going into the far-right stretch to add quieter attacks the detector is less sure about (soft hits over a ringing sustain, ghost notes). While you’re on the slider the ticks light up in the accent color so you can watch the set change; they settle back to faint once you let go. Your setting is remembered across takes. The ±10 ms buttons cover the last mile, and Audition replays the window any time.
- Zoom. Pinch the detail lane to zoom in for finer placement — the window narrows around the pinned marker, down to a fifth of a second across the lane. Double-tap to jump back to the normal view. A beat can never be dragged onto its neighbor: a shaded zone marks the small keep-out area around each neighboring beat, and the drag stops firmly at its edge — if the shading slides into view, you’ve scrubbed all the way to the next beat.
- Even Out moves the beat to the midpoint of its two neighbors (needs a beat on both sides). Delete removes the beat and leaves the gap. Insert adds a beat at the pinned centerline and selects it, so you can drag it into place. Undo steps back through your changes.
- Original returns the selected beat to the spot where you actually tapped it, shown as a dashed line in the detail lane once the beat has moved off it. Your tapped positions are saved with the beat timing, so Original still works in later editing sessions — edit as much as you like and you can always get the feel of your tapped performance back. Only retapping the take records a new set of positions. (Beats added with Insert have no tapped position.)
Once you make a manual edit, the stray-tap marks and Use All Taps no longer apply — the edited beat list is exactly what you hear and what Save commits. Done returns to review.
Tap Save to commit the reviewed Beat Timing. Retap changes only the draft; Cancel closes the screen, discards that draft, and leaves the previously saved timing unchanged. Remove Beat Timing is the explicit destructive action. After a map is saved, a small dot beside Groove confirms that Beat Timing is available for the take.
You don’t have to set a tempo at all — MemoToMIDI works fine with free timing. A tempo makes bar-aligned editing and export possible.
6. Importing audio
You can bring in an audio file instead of recording fresh.
From the app
- In the Library, tap Import.
- Pick an audio file from Files, iCloud Drive, or wherever it lives.
- The app converts it and adds it to your Library. You’ll see Importing Audio while it works, then the take is ready to open in Detection.
MemoToMIDI handles WAV, M4A, MP3, AIF, and CAF files. If a file’s format isn’t supported you’ll see Import Failed; convert it to one of those formats first.
From another app (the Share Sheet)
You can also send audio to MemoToMIDI from elsewhere — Files, Voice Memos, a browser, a messaging app:
- Tap Share in the other app.
- Choose MemoToMIDI from the share sheet.
- A brief Importing to MemoToMIDI… screen appears, then the app opens with your file in the Library.
If MemoToMIDI can’t open right away, it leaves a notification — “1 recording ready to import. Tap to open.” — and finishes the import the next time you open the app.
Imported audio behaves like a recording from here on: open it, let it transcribe, edit, and export.
7. Your recording library
Every take you record or import lands in the Library and stays until you delete it.
What a row shows
Each row shows:
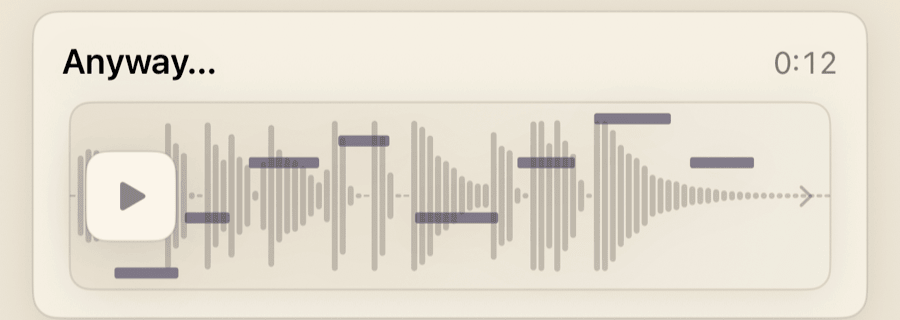
- Its name and length.
- A thumbnail of the waveform. Once a take is transcribed, its notes are drawn over the waveform too, so you can recognize a take at a glance.
- A play button (▶) on the thumbnail — tap it for a quick listen without opening the take; tap again (■) to stop.
Tap anywhere else on the row to open the take in Detection.
Sorting
With more than one recording, a sort control appears next to the Library heading. You can sort by:
- Date created — newest or oldest first.
- Date modified — recently edited or oldest first.
- Name — A–Z or Z–A.
Managing takes
- Rename — touch and hold a recording, choose Rename, and type a new name. You can also tap the pencil beside the title in the Editor. Changing the recording name never changes its MIDI export filename. Leave the field empty to return to the automatic date-and-time name.
- Duplicate — touch and hold, then Duplicate to make a copy before trying a different edit.
- Delete — swipe the row left and tap Delete. You’ll confirm, because this removes the recording and its MIDI edits for good.
8. Transcription basics
Open a take in Detection and the app transcribes it: it analyzes the audio and lays the notes onto a piano roll. Treat that first pass as a starting point — it gets you most of the way, and you fix what it missed from here.
It happens automatically
There’s no transcribe button. As soon as a recording finishes — or you open a take from the Library — the app transcribes it: you’ll see Processing audio… for a moment, then the notes appear, ready to play or edit.
The three tabs
Detection has three tabs:
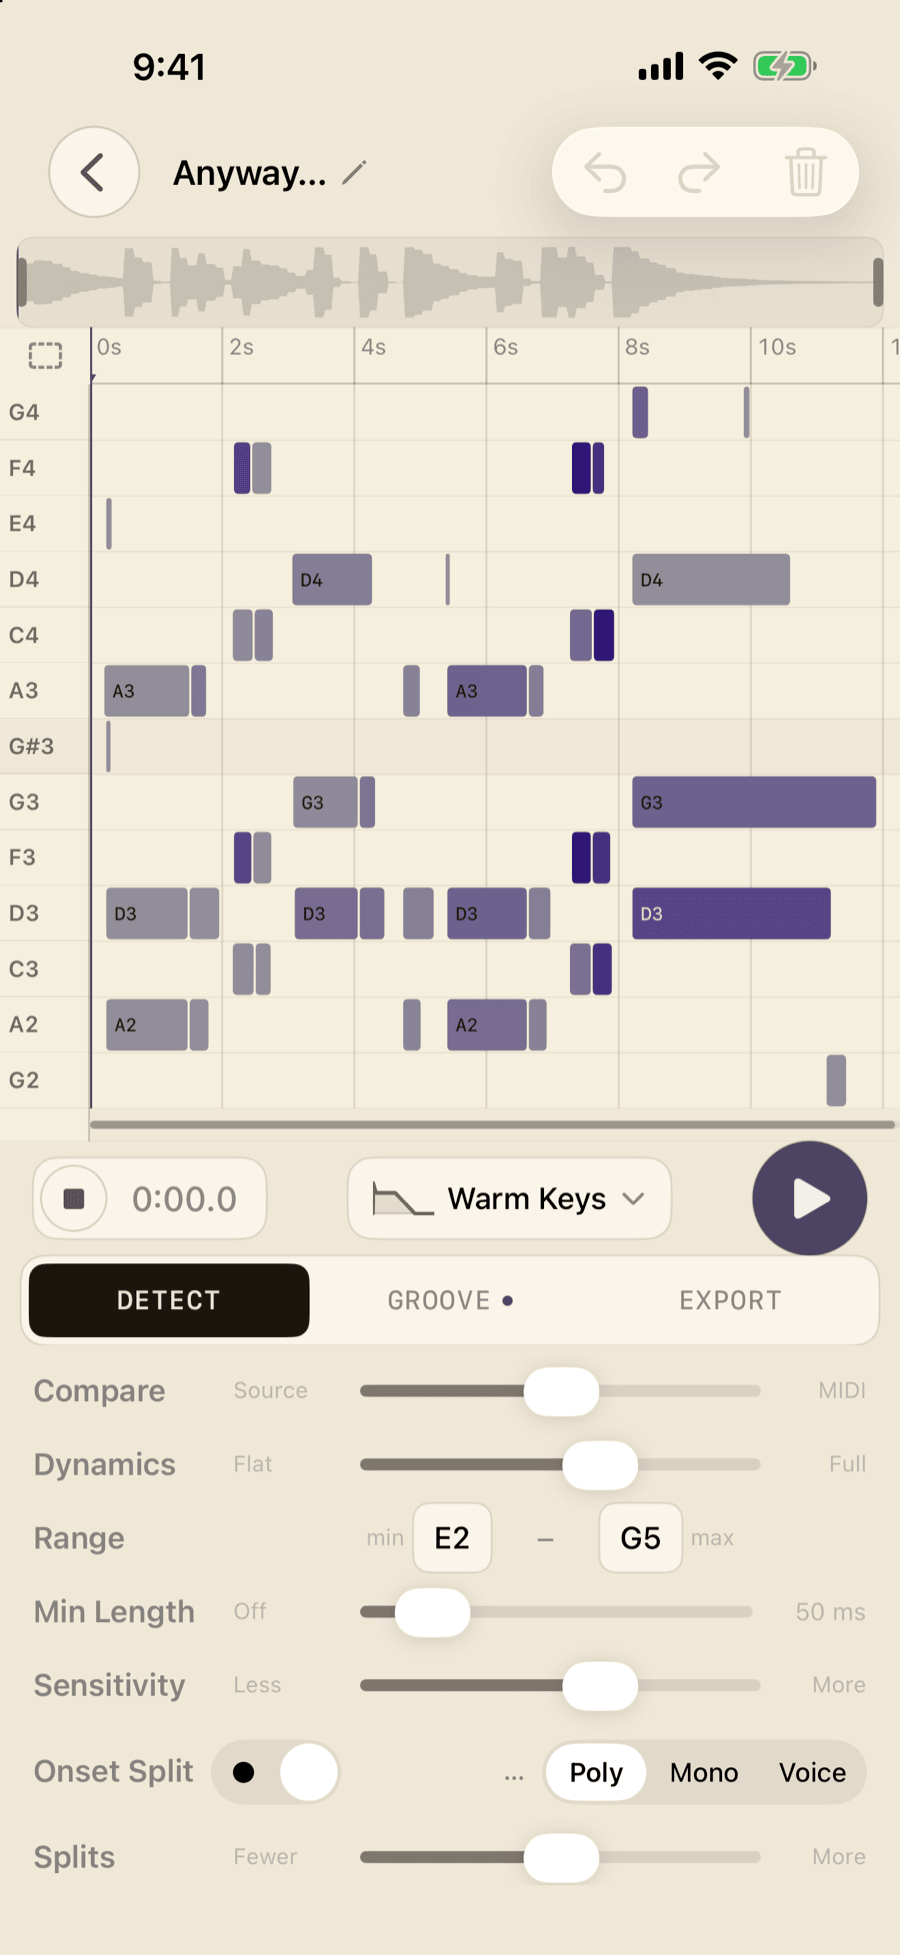
- Detect — the transcription and the controls that shape it.
- Groove — tightening timing against the beat.
- Export — turning the finished notes into a MIDI file.
Poly, Mono, Voice
The Detect tab has a Mode switch with three settings:
- Poly (polyphonic) — for anything with more than one note at a time: chords, strummed guitar, piano parts. Poly automatically preserves notes that keep ringing through short detector dropouts while leaving real mutes and repeated attacks available to the normal note-splitting controls. There is no separate Sustain setting to manage.
- Mono (monophonic) — for one note at a time: a bass line, a flute, a lead. Telling the app there’s only ever one note stops it from detecting phantom extras.
- Voice — for singing. A sung note drifts in pitch and carries breath and consonant noise that Mono reads as extra notes; Voice holds a note through that drift and keeps the note boundaries where you re-articulated.
If a transcription looks cluttered with notes you didn’t play, switch modes — a single-line melody read in Poly is the most common cause.
Singing a melody in
A musical idea is not attached to its lyrics. To get a melody out of your head and into MIDI, sing each note as “bah” and hold the vowel until the next note. The “b” marks where each note starts — including a repeated note on the same pitch — and the held vowel gives the app a steady pitch to read.
Lyrics and humming still work; expect more cleanup. Words move the pitch around inside a note, and humming gives repeated notes no boundary to find, so pairs can read as one long note.
9. Fine-tuning detection
If the first pass isn’t right, the Detect tab has a handful of controls that re-run the transcription as you adjust them. Make small changes and watch the roll update.
The controls
-
Range (min – max). The app keeps only notes inside this range — useful for cutting low rumble or high ghost notes. Tap the min or max chip to pick a note by hand.
When you first open a take, the range fits itself to your playing. It starts from a default of C2–C6 and widens outward to take in the bulk of the detected pitches, so a take with low bass or a high lead reveals that content without you touching the chips. It only ever widens, never narrows, so isolated rumble or squeal at the extremes stays filtered. Low instruments — bass, low piano, cello — are read right down to their bottom notes. If real notes still fall outside the range, a banner appears above the roll with a Fit to content button that widens it to include them.
-
Min Length. Ignore notes shorter than the set length (up to 300 ms). Most of the unintended artifacts that the app produces are short and can be filtered in this way. Slide it to Off to keep everything.
-
Sensitivity (Poly only — Less … More). How freely the app picks up notes. Toward More catches quiet or subtle notes; toward Less keeps only the clearly played ones. In Mono this control is hidden — single-line detection doesn’t use it.
-
Onset Split. Turn this on when a repeated note on the same pitch reads as one long note instead of several. With it on, a Splits slider (Fewer … More) sets how eagerly the app breaks re-struck notes apart.
In Voice mode two of these rows change:
- Pitch Hold (replaces Min Length). How long a sung note holds its pitch through a drift or wobble before the app accepts it as a real note change. Raise it if vibrato or pitch drift splits notes that you sang as one; lower it if quick real note changes get absorbed.
- Splits (replaces the Onset Split toggle — Fewer … More). How much attack evidence it takes to start a new note. Toward More catches soft re-articulations — hummed repeated notes, legato singing — at the cost of extra notes; toward Fewer keeps only clearly re-articulated boundaries. The default sits left of center, tuned for “bah”-style takes. The middle of the slider is a real boundary: left of it the app also heals splits that land mid-vowel with no audible gap; right of it that safety net switches off so soft re-articulations can come through.
A tuning order that works
- Set Mode first — Poly, Mono, or Voice (see Transcription basics).
- Adjust the Range if the auto-fit left anything out, or to tighten it to your instrument.
- Nudge Sensitivity until you’re catching what you played without too many extras.
- Use Min Length to sweep up leftover specks.
Editing locks these controls
Once you start editing notes by hand, the detection controls grey out. That’s deliberate: re-running detection would throw your manual edits away. To get them back, tap Reset manual edits — it clears your hand edits (after a confirmation) and unlocks the controls. So it’s worth getting detection close before you fine-edit individual notes.
10. Editing notes (the piano roll)
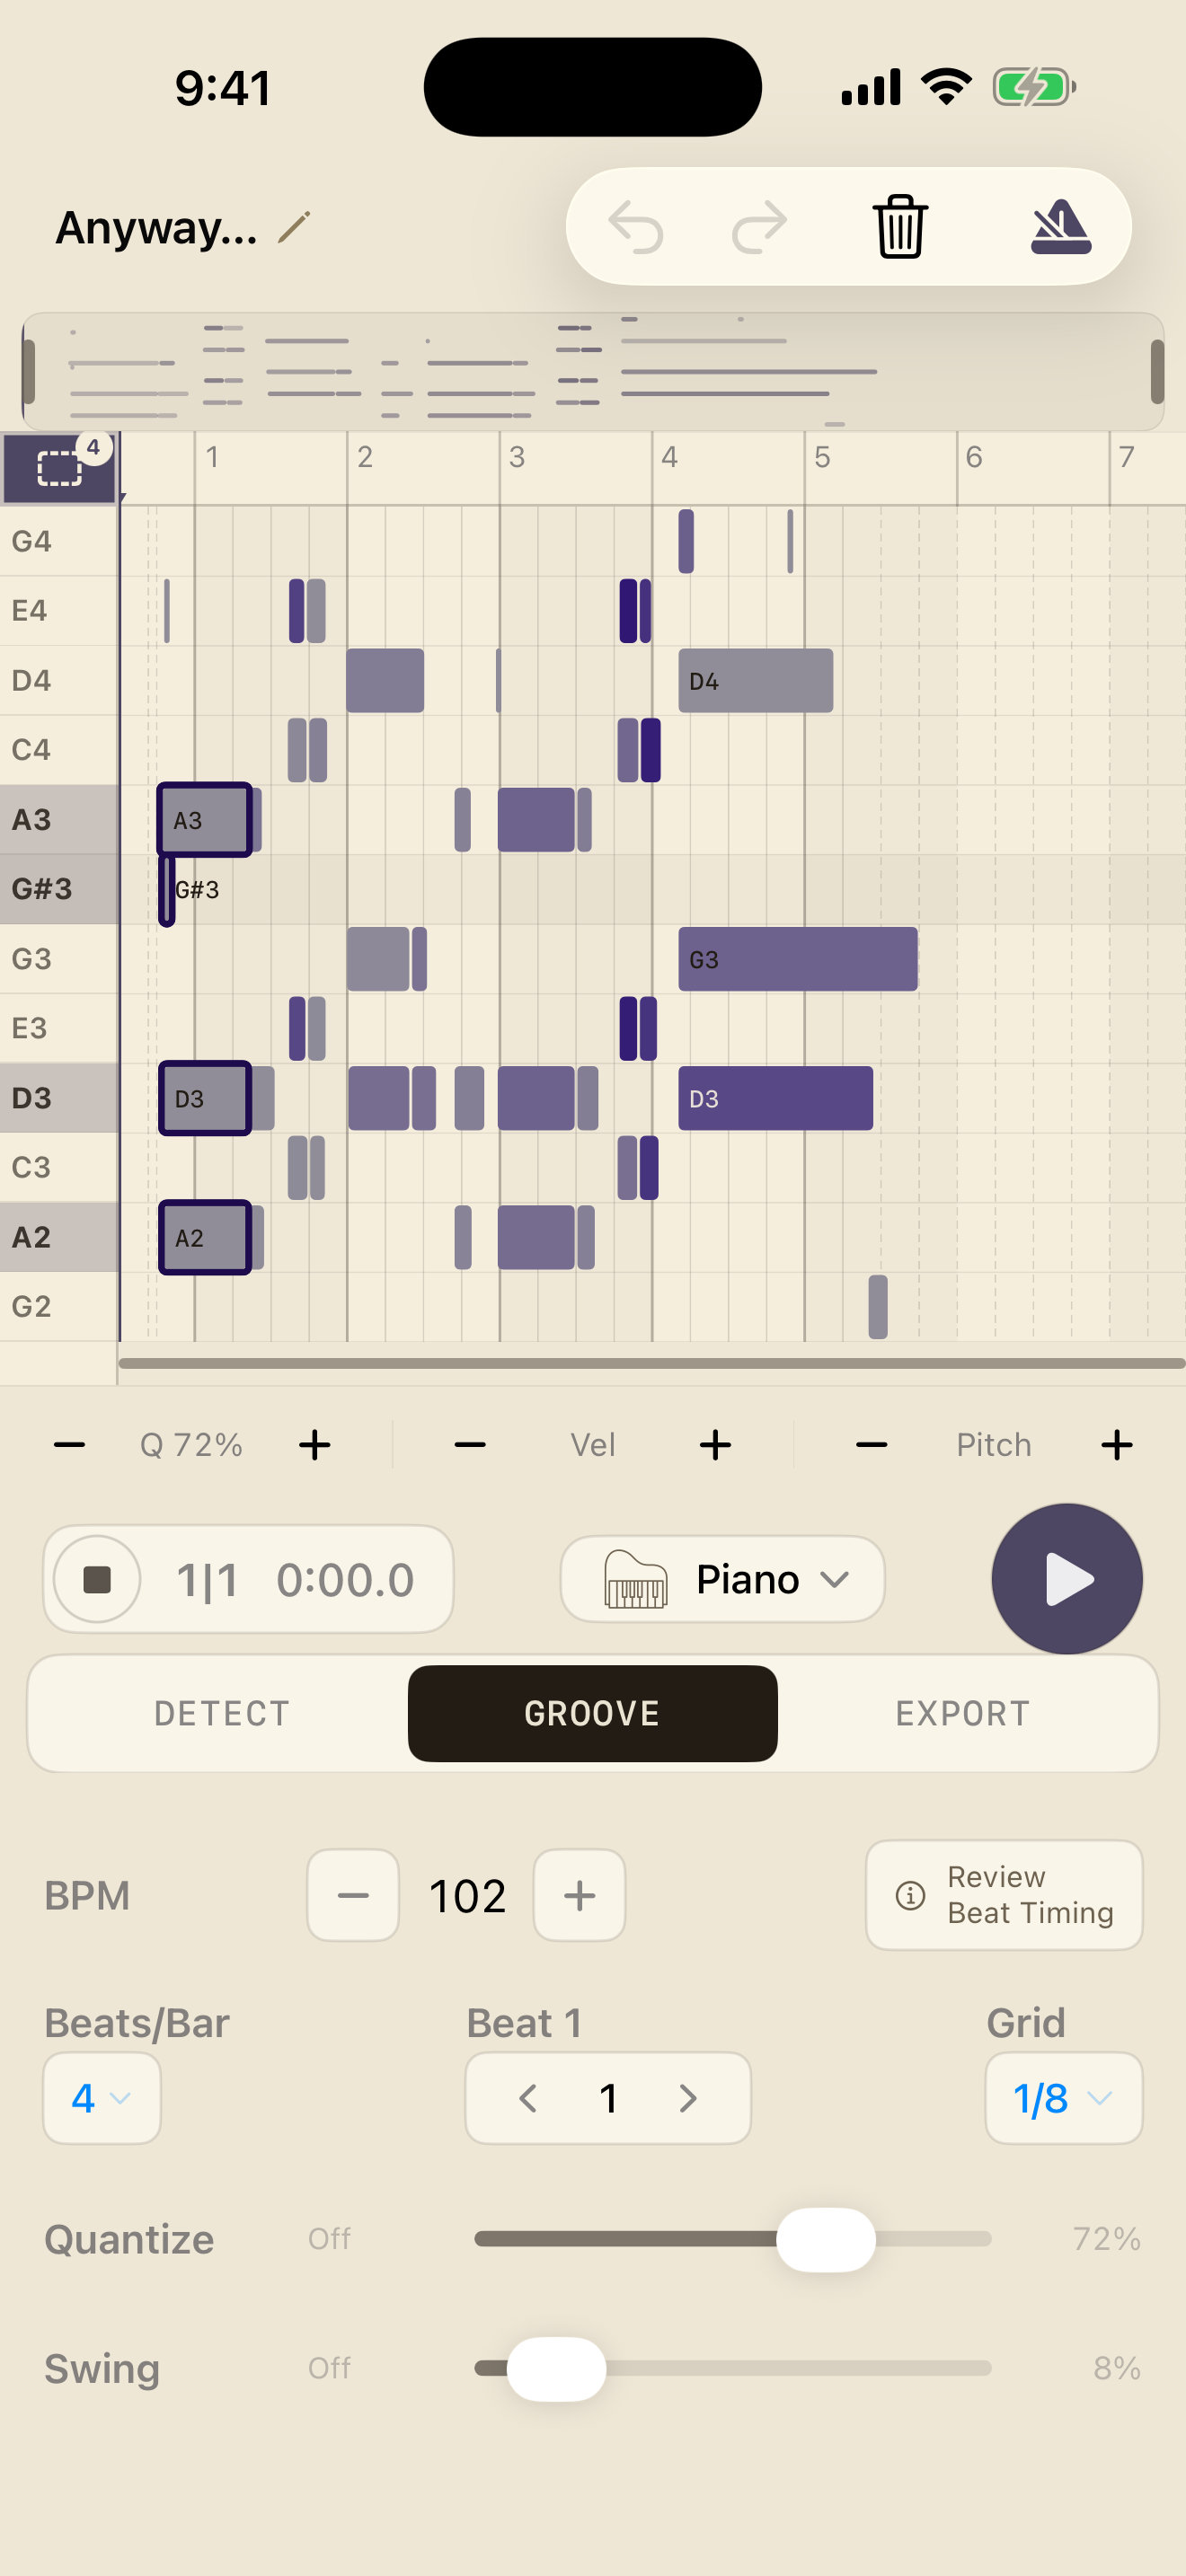
The piano roll is where you fix whatever the transcription got wrong. Time runs left to right; pitch runs bottom (low) to top (high). Each note is a block.
Getting around
- Pinch to zoom; drag the background to pan.
- When you rotate the phone or re-run detection, the roll preserves your place in the view, so you can keep working without being jumped to a selected note.
- The toolbar shows the current bar and beat, and a metronome toggle adds a click during playback.
- On iPhone in landscape, tap the rotate icon for a reminder that Detect, Groove, and Export live in portrait. Note editing remains available in landscape.
Selecting notes
Tap a note to select it; a selected note gets a compact editing inspector. For this ordinary single-note selection, tapping empty space clears it.
To work on several notes at once, tap the dashed-rectangle Select control in the pitch corner. Drag a rectangle over the notes you want, tap individual notes to add or remove them, or tap a pitch-row label to select that pitch. Empty space clears the set while Select mode stays on. In Select mode, use two fingers to pan and pinch to zoom; tap Select again when the set is ready to edit. The selected notes stay protected from accidental taps until you deliberately clear or change the set.
If a selected note is excluded by the pitch range, trim range, or Scale Lock Drop, it can remain visible as a dashed ghost so you can see what changed. Ghost notes are inactive: they do not play or export, and a ghost-only selection cannot be deleted until the notes are included again.
Moving, resizing, and merging
- Move — drag a note to slide it in time, or up and down in pitch. A selected group moves together in time and keeps its pitches and spacing.
- Resize — drag the handle at a note’s start or end edge to change where it begins or how long it lasts. A selected group resizes from the same edge together.
- Merge — drag one note’s edge into the note next to it to join them, useful when one note got split in two.
Fine adjustments (the selection inspector)
With a note or group selected, the inspector offers precise controls. On iPhone in portrait, timing or quantize, velocity, and pitch readouts stack so their full values remain visible; especially narrow layouts condense them further. Its controls apply to every note in the selected group:
- Timing — on Detect, small and micro nudges move notes earlier or later. On Groove and Export, when the take has a beat map, this becomes the per-note Q n% control: use minus and plus to set each selected note’s quantize strength. Tap its percentage to clear the overrides and return to the recording-wide Quantize setting.
- Pitch — up or down a semitone at a time; the note’s name shows between the arrows.
- Velocity — louder or softer (see Dynamics & velocity).
Adding and deleting notes
- Add — touch and hold an empty part of the roll to place a new note. While you hold, drag to position it in time and pitch, then lift to drop it in. It arrives at a default length; adjust its start and end with the handles, like any other note.
- Delete — select a note (or several) and tap the trash in the toolbar.
Looping a section
A trim range bar sets a start and end point on the take. Drag the handles inward and playback loops between them. The same range also crops the take: anything outside the handles is left out of what you export.
The strip doubles as a navigator for the whole take: tap empty space in it to move the playhead there, or drag to scrub. If the spot you pick is off screen, the roll scrolls just enough to bring it into view.
Undo, redo, reset
- Undo and Redo sit in the toolbar — every edit is reversible.
- Reset manual edits clears your hand changes and unlocks the detection controls again. It asks to confirm first.
11. Dynamics & velocity
Every MIDI note carries a velocity — how hard it was played, which usually comes through as how loud it sounds. MemoToMIDI gives you one overall control and one per-note control.
The Dynamics slider
On the Detect tab, the Dynamics slider sets how much velocity varies across the take:
- Flat — every note gets a similar velocity.
- Natural — the middle setting (and default) keeps the relative louds and softs the app recovered from this recording.
- Full — the louds and softs of your playing map across a wide velocity range.
Slide between the three to taste. Dynamics changes how strongly the notes play; it does not add or remove notes from the transcription.
Per-note velocity
For individual notes, select a note and use the louder / softer buttons in the selection inspector. The note’s current velocity shows as you adjust it.
Velocity travels with the MIDI you export, so whatever you set here is what your DAW or instrument plays back.
12. Playback & sound
You can play your transcription back at any point and choose what it plays through.
Playing back
Press play to hear the notes on the roll; stop returns to the start. The roll follows along and the bar/beat counter keeps time. Turn on the metronome for a click alongside.
Source vs MIDI — the Compare slider
On the Detect tab, the Compare slider crossfades between two things:
- Source — your original recording.
- MIDI — the transcription, played by the app.
Slide toward either (or anywhere between) to A/B them and hear how closely the notes match what you played. It’s the quickest way to catch a wrong or missing note. Compare lives on the Detect tab only; on the Groove and Export tabs, playback is the MIDI alone.
Choosing a sound
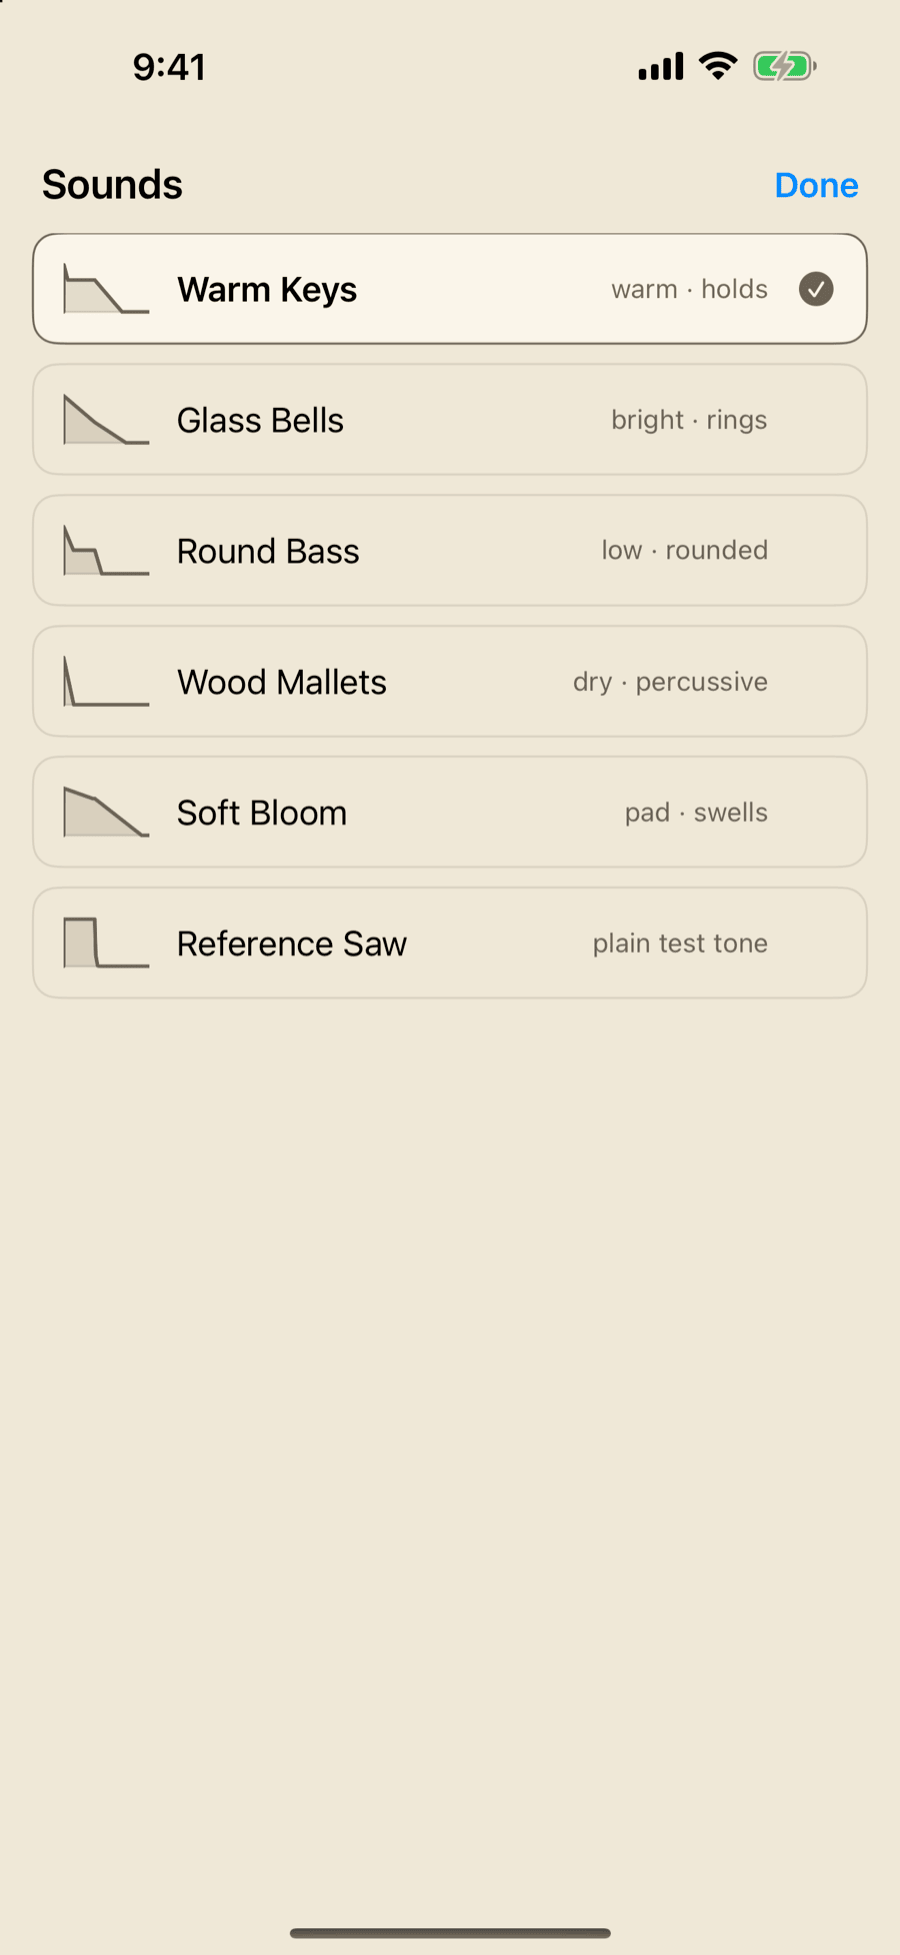
Tap the Sound picker to choose one of six MemoToMIDI playback voices. New takes start on Warm Keys:
- Warm Keys — warm · holds
- Glass Bells — bright · rings
- Round Bass — low · rounded
- Wood Mallets — dry · percussive
- Soft Bloom — pad · swells
- Reference Saw — plain test tone
Tap a sound to select it and preview it when playback is stopped; tap the selected sound again to hear it again. The picker uses one scrollable column on both iPhone and iPad; tap Done or swipe down to close it.
The sound is only for auditioning in the app. It doesn’t change the notes, and the MIDI you export carries the notes, not the sound — pick any instrument you like in your DAW afterward.
After updating: takes that used an older sampled instrument or waveform keep their notes and edits, but the retired sound is replaced by one of the six current voices. The in-app audition may therefore sound different. Exported MIDI is unaffected.
13. Tightening timing & exporting MIDI
The last two tabs — Groove and Export — tidy the timing and turn your work into a MIDI file.
Groove: snapping to the grid
If you played a little loose, the Groove tab pulls notes onto a rhythmic grid. Turn quantize on, then set:
- Quantize (0–100%) — how strongly notes snap to the grid. 100% locks them exactly to the grid; lower amounts tighten the timing while keeping some of your natural feel.
- Grid — the note value notes snap to (1/4, 1/8, 1/16, and triplet grids).
- Swing (0–100%) — a swung, shuffled feel. Available with quantize on and a suitable grid.
Quantizing snaps notes to the beat, so it needs the take to have a beat map — the app’s record of where the beats fall in your recording. You make one by recording to a click or by tapping the beat in afterward (see Tempo & beat-tap); without one, Groove has no beats to snap to. There’s also an export tempo here: the BPM written into the MIDI file, so your DAW opens it at the right speed.
Export: saving the MIDI
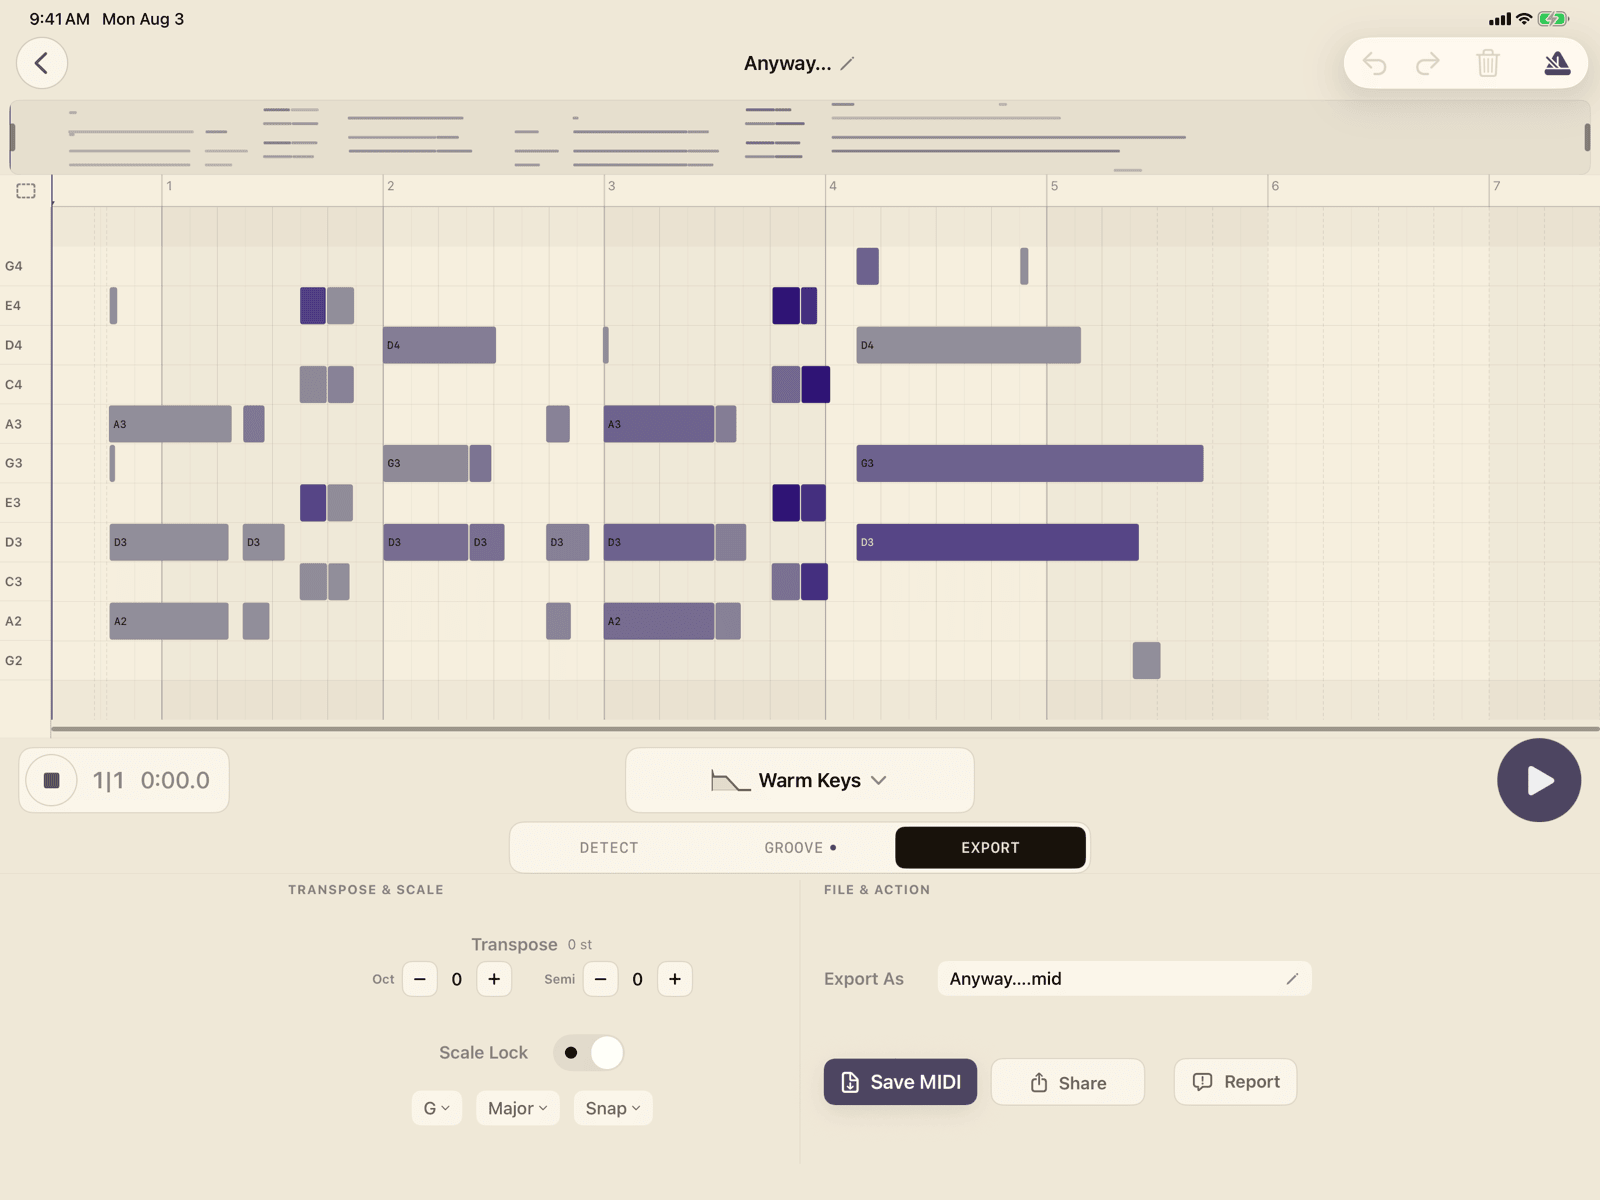
On the Export tab:
- Export As sets the standard
.midfilename. Tap its pencil to change it; it defaults from the recording name, but changing it does not rename the recording. - Save MIDI writes that
.midfile. - Share opens the iOS share sheet — AirDrop it, email it, drop it into Files, or send it to another music app.
- Transpose shifts the exported notes up or down by octaves and semitones, if you want the file to land in a different register than you played.
- Scale Lock constrains the notes to a key. Turn it on, pick a Key and a Scale, then choose Snap to pull off-scale notes onto the nearest scale tone, or Drop to remove them. A quick way to clean up stray or mis-detected notes that fall outside the key you played in.
- One Note is a Scale choice that collapses every note onto a single pitch, turning a melodic take into a rhythm or drum-trigger track. Pick the Key and an Octave (0–5, default C1 — the Logic/GM drum-map convention where C1 triggers a kick) and the whole take lands on that one note, keeping its rhythm. Chords played together become one hit; a held note never swallows the attacks underneath it. The preview collapses live and turning Scale Lock off restores the melody.
The exported file is a Standard MIDI File, the format every DAW reads. It carries your notes, their timing and velocities, and the tempo. Open it in Logic, Ableton, GarageBand, FL Studio, or anything else, and assign whatever instrument you like.
Save and Share stay greyed out until there are notes to export. If they’re disabled, go back to Detect and check the transcription has notes.
Bringing a MIDI file into GarageBand for iOS
GarageBand imports a .mid through its own Loop Browser → Files picker. Where
you drop it matters, and one of its rules catches people out silently — that one
is not a MemoToMIDI setting and gives you no error message; the take just arrives
short.
- Drop it on the empty space below your tracks. GarageBand creates a new Keyboard track for it, which is the simplest way in and avoids the next point entirely.
- Otherwise, the file needs a software instrument track. A MIDI region cannot sit on an Audio Recorder track, which is the track you were most likely just recording on — GarageBand greys the track out and shows a small “no entry” badge rather than explaining. Create or select a software instrument track first, then import.
- A non-Automatic section length silently truncates the region. GarageBand’s song sections have a fixed length unless you set them to Automatic, and an imported region longer than the current section is cut off at the section end rather than extending it. If your take arrives short, open the section controls (the + at the right of the track area), set the length to Automatic or to enough bars for the whole take, and import again.
14. Using MemoToMIDI inside another app (the plugin)
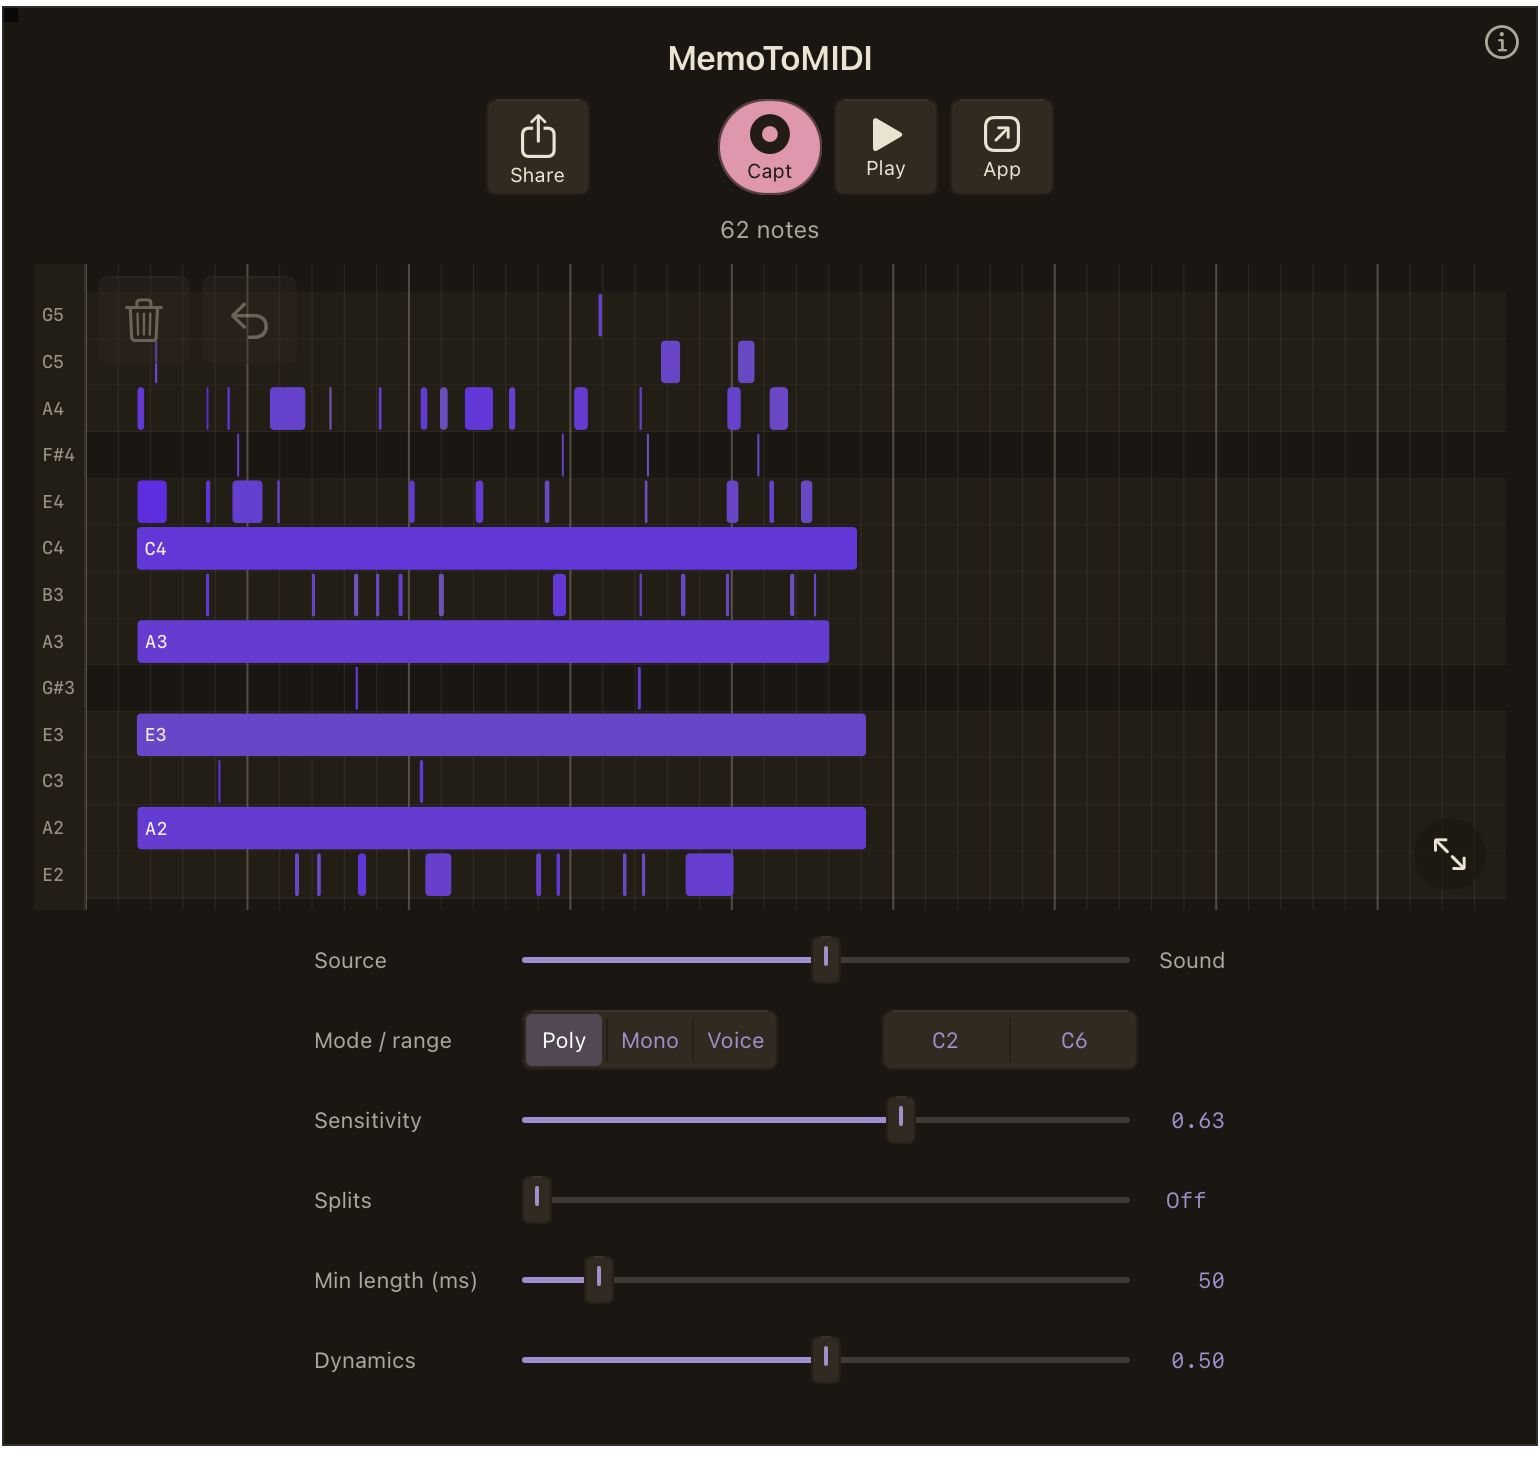
MemoToMIDI installs an Audio Unit (AUv3) plugin alongside the app, on iPhone and iPad and on the Mac, so you can capture and transcribe without leaving your music app.
It is an audio effect, not an instrument. Put it on the track carrying the sound you want transcribed — an audio track with a guitar or a vocal on it, or a live input — and it listens to what passes through. Adding it to an instrument track gives it nothing to hear.
Finding it in your host
- iPhone and iPad — hosts that load Audio Units list it in their plugin browser: AUM, GarageBand, Logic Pro for iPad, Cubasis and others. It appears under MemoToMIDI, as an audio effect.
- Mac — the Mac app installs the plugin the first time you run it. In Logic Pro it is in an audio track’s Audio FX slot, under Audio Units → MemoToMIDI → MemoToMIDI. If a host has already scanned its plugins, rescan or restart it once so the new plugin is picked up.
What the plugin does
Capture records what the host sends the track, and the take transcribes automatically when you stop. You get the piano roll, the detection controls and playback in the host’s window.
Capture is capped, because the audio is held in memory:
- four minutes on iPhone and iPad
- six minutes on the Mac
Reach the cap and capture stops on its own and transcribes what it has — nothing after the limit is kept. For longer material, record in the app instead.
The click track, the tuner, the recording library and quantize and groove stay in the app. The plugin is for getting an idea out of a track you already have; tightening timing to a grid happens in the app, or in your host.
Editing in the plugin
How much you can change in the plugin depends on the platform, because the Mac gets a mouse and a much bigger window.
- On iPhone and iPad you can tap a note to select it, delete it, Undo, and Reset edits to bring the detected notes back. You cannot drag notes to move or resize them there — open the take in the app for that.
- On the Mac the roll is fully editable: drag a note’s body to move it, drag its leading or trailing edge to resize it, delete, Undo and Redo. Reset All clears every manual edit. Dragging a note up or down moves it to another pitch already used in the take; to put a note on a pitch nothing else uses, select it and press Option-Up or Option-Down — hold Shift for a whole octave.
Both platforms carry the detection controls — mode, sensitivity, pitch range, minimum length — and the Source/Sound comparison for checking the transcription against the audio it came from.
Getting a take out of the plugin
This is the part that differs most between the two platforms.
On iPhone and iPad, two controls do it, and which one you want depends on where you’re going next.
- Add to Song writes the take as a
.midfile into iCloud Drive → MemoToMIDI, where your host’s own file picker can import it — no app switching. The file is named after the take and the date it was written (Continued Take 2026-08-30 14-22-05.mid), so several attempts stay apart. Adding the same take twice writes a second file; nothing is ever replaced, and nothing deletes these files for you — tidy them up in the Files app when you’re done with them. - Open in App hands the take to the MemoToMIDI app instead, which opens it ready to edit. Use it when you want the full editor, or when Add to Song isn’t there.
Add to Song only appears when iCloud Drive is available. It writes into your iCloud Drive folder, so if you’re signed out of iCloud or have iCloud Drive turned off, the control is hidden rather than shown and broken. Open in App always works, so you’re never stuck.
In a narrow plugin window, controls shed down to icons; Add to Song becomes a
Song icon and Open in App an App icon. Both do the same thing they do
when labelled.
On the Mac, you drag the MIDI out directly. The Drag MIDI chip in the
plugin’s Deliver section is a real .mid file — drag it onto a MIDI or software
instrument track in your host and the region lands where you drop it. No file
picker, no iCloud.
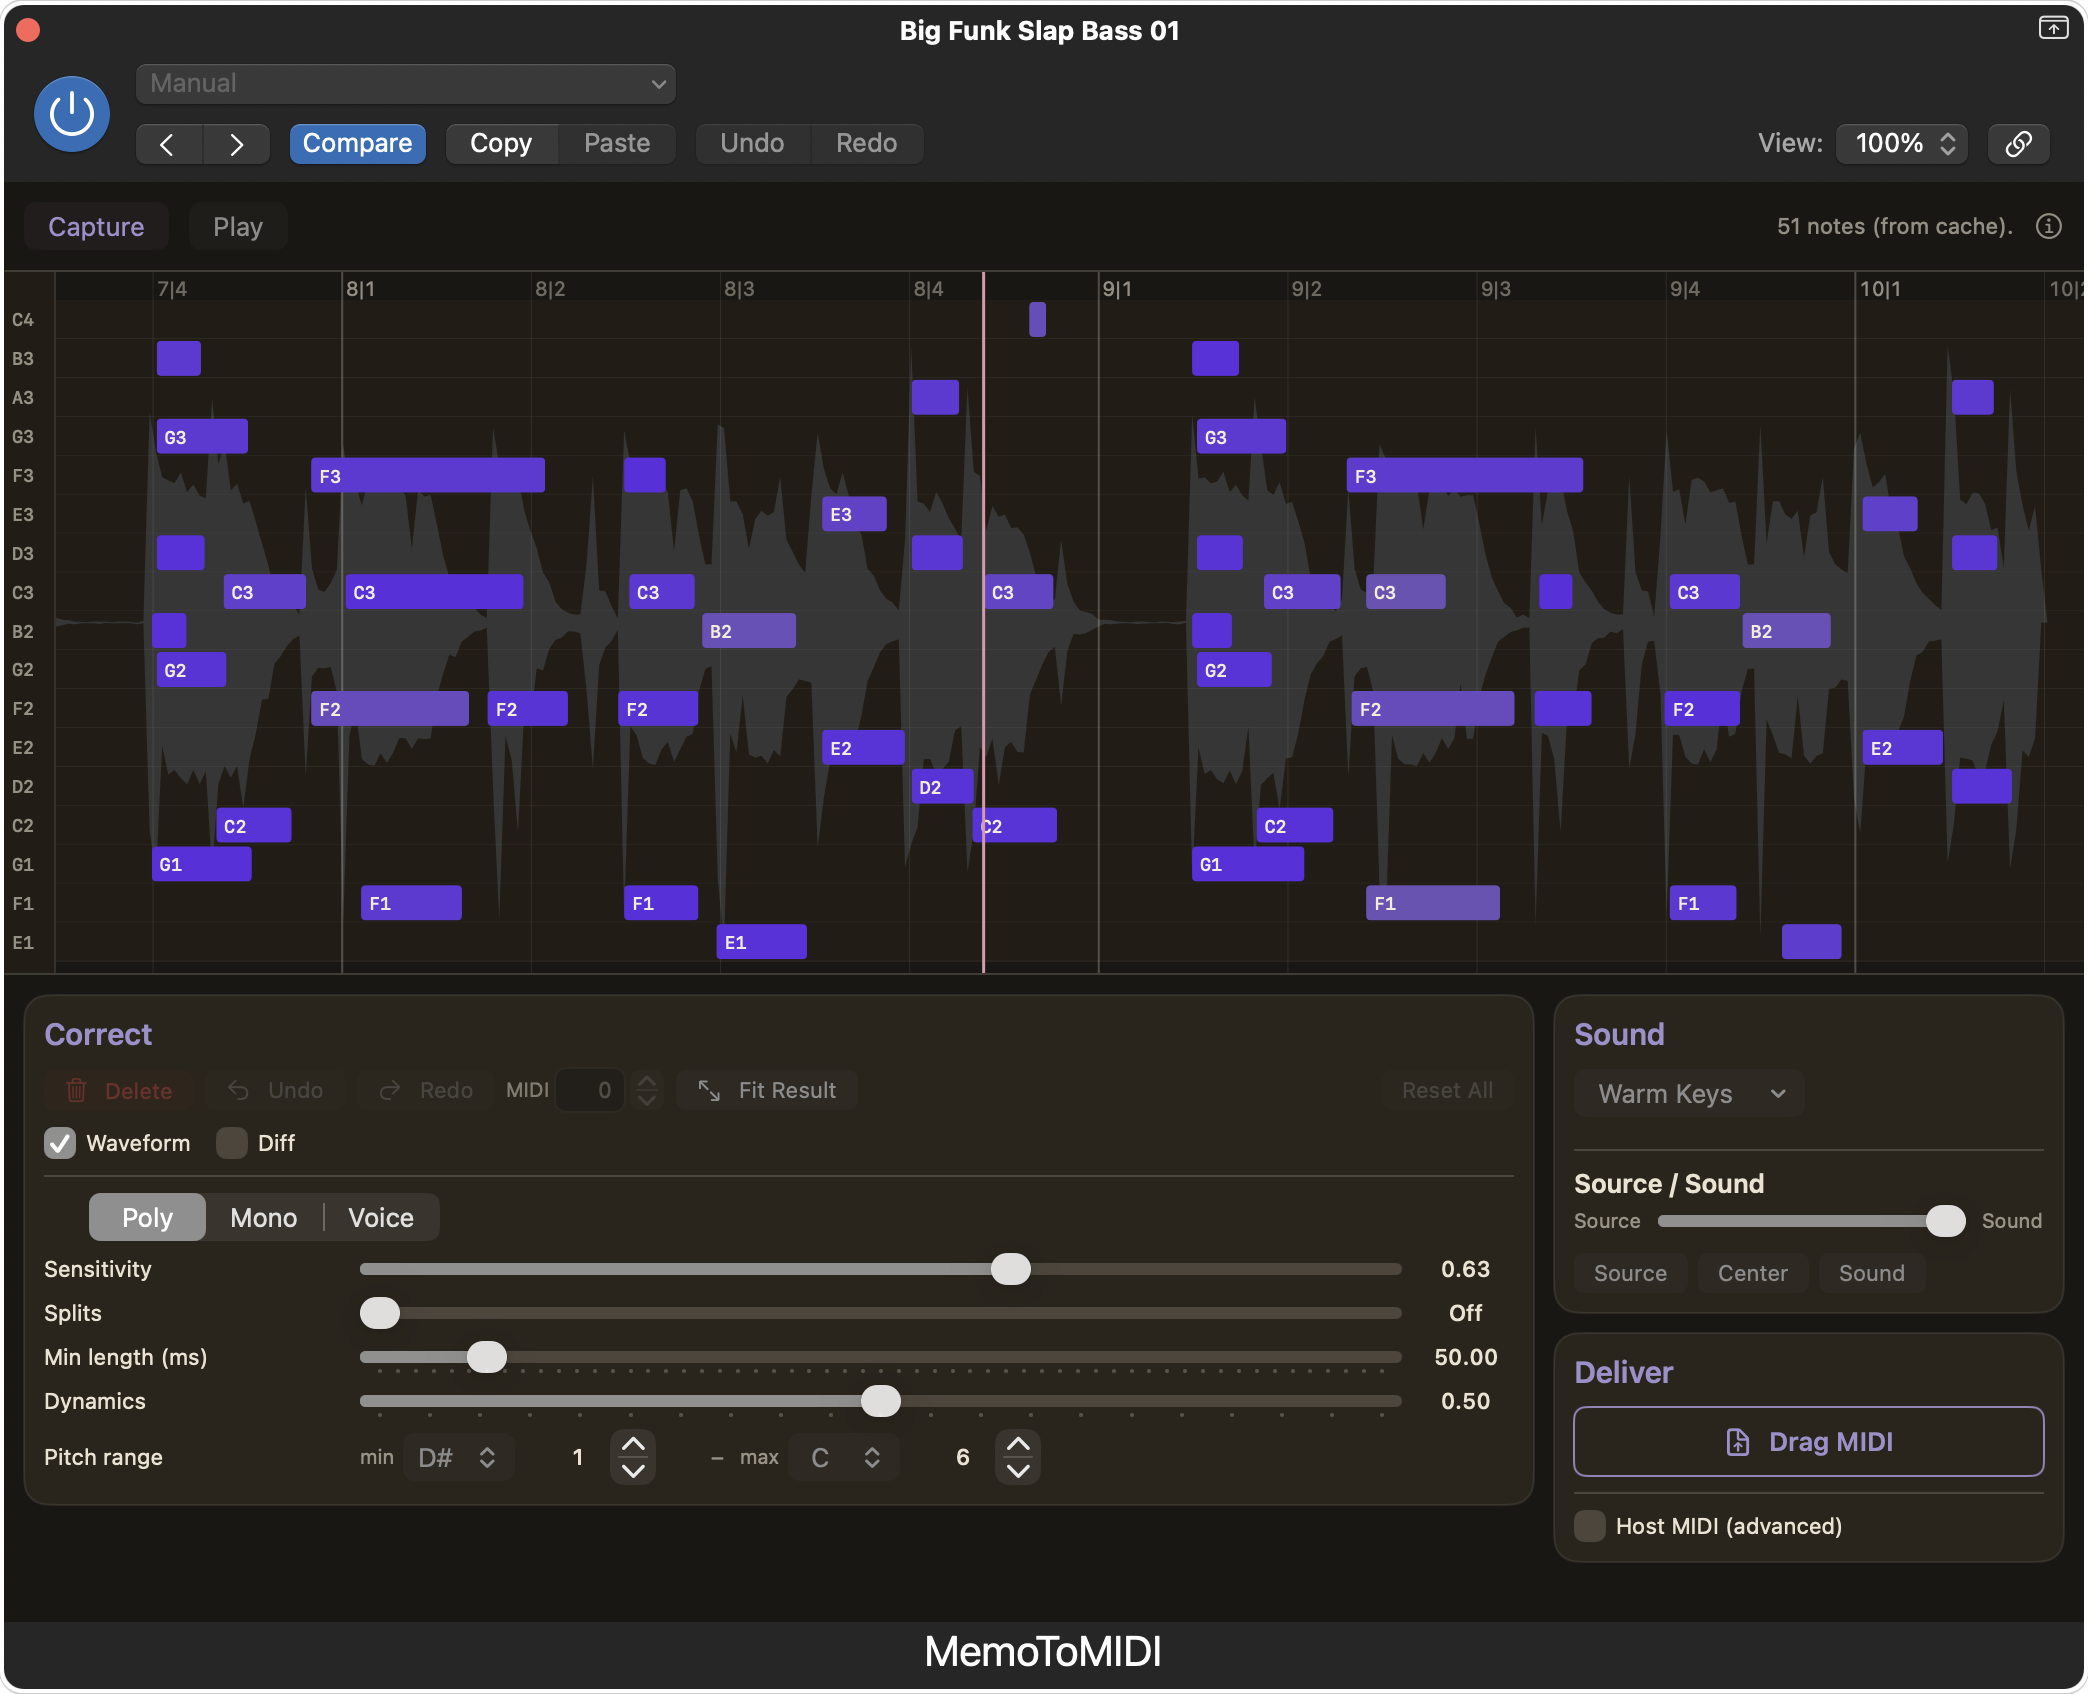
There is also a Host MIDI (advanced) switch, which offers the plugin’s MIDI as a live output your host can route to an instrument track. Whether it works depends on the host wiring that route — the plugin tells you which it did, Host route connected or Host route unavailable. Drag MIDI is the reliable path; reach for Host MIDI only if you specifically want live routing.
Importing what you added into your host
On iOS your host imports the .mid through its own file picker — in GarageBand
for iOS, Loop Browser → Files → Browse items from the Files app, then
iCloud Drive → MemoToMIDI. GarageBand’s two import traps apply exactly as they
do to a file exported from the app: a MIDI region needs a software instrument
track, and a non-Automatic section length silently truncates it. Both are
described in §13, Bringing a MIDI file into GarageBand for iOS — worth reading
before you conclude the plugin dropped half your take.
On the Mac, dragging the chip skips all of this. Drop it on a software instrument track and Logic makes the region for you.
15. The Mac app
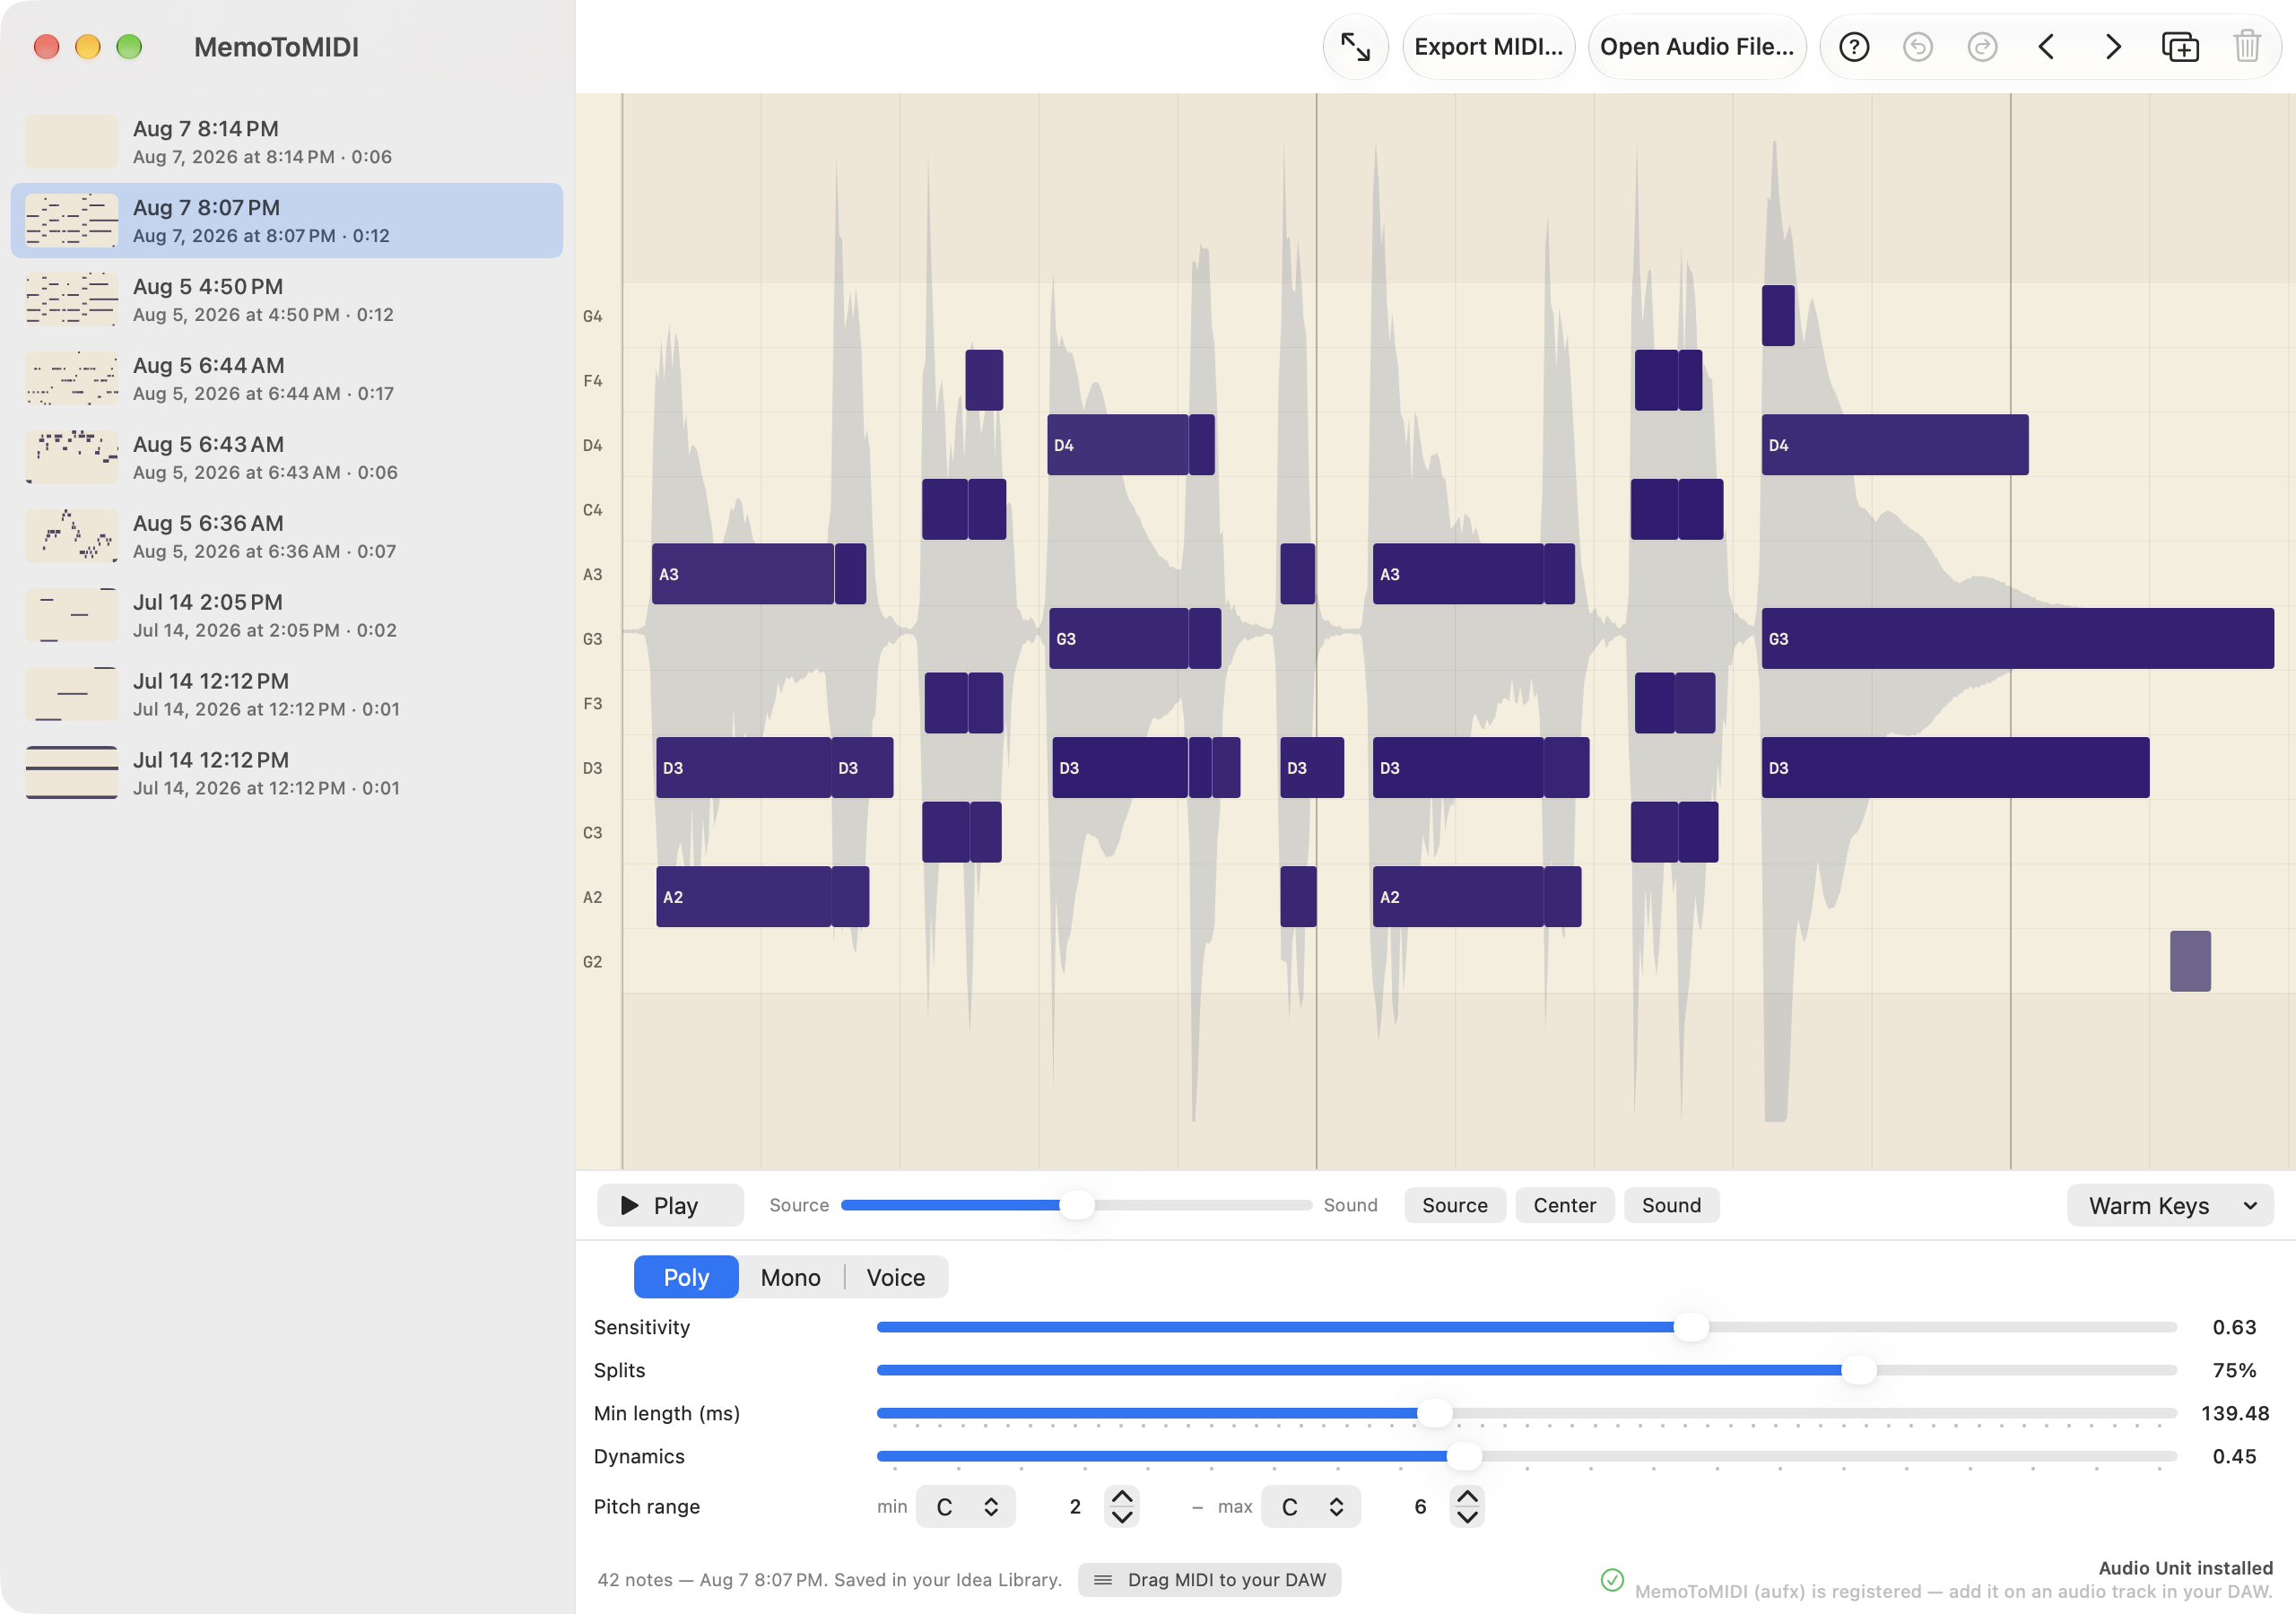
The Mac app is not a Mac copy of the iPhone app. It does not record, and it has no tuner or click track — a Mac already has a DAW for that. It is built around one job: turn audio files you already have into MIDI, and keep them where you can find them again.
Getting audio in
Drop an audio file on the window, or use Open Audio File…. It transcribes and lands in your Idea Library, which lives on that Mac — every file you import stays there until you remove it. Nothing leaves the Mac at all: the library is local, and the Mac has no iCloud folder of its own.
Refining
The piano roll works the way the Mac plugin’s does: drag a note’s body to move it, drag an edge to resize, select and press Delete to remove it, Undo and Redo with the usual Command–Z and Shift–Command–Z. Fit Result frames the whole transcription. Reset Edits clears your manual changes and brings the detected notes back as they were.
The detection controls sit below the roll, and they are the same ones the app and the plugin carry. §9 describes what each does.
Getting MIDI out
Two ways, and they produce the same file:
- Drag the MIDI chip in the footer onto a track in your DAW.
- Export MIDI… saves a
.midfile wherever you choose.
Importing, transcribing and refining are free. Exporting the MIDI — saving a
.mid or dragging it into your DAW — is part of the one-time MemoToMIDI unlock.
Help
The Help button in the toolbar has the first steps and a link to this manual.
16. Settings
Open settings from the gear in the corner of the Library. Everything here is optional; the defaults are sensible.
Appearance
- Color Scheme — Light, Dark, or follow your device.
- Accent Color — pick a color from a palette of swatches. It colors your notes in the piano roll, the playhead, selections, and active controls; everything else stays neutral. Cosmetic only.
Accessibility
MemoToMIDI follows several accessibility settings from iOS and iPadOS automatically:
- Larger Text scales labels and readouts; editor panels scroll when the larger layout needs more room.
- Reduce Motion stops continuous breathing, glow, waveform, tuner, and beat animations while keeping their information available.
- Increase Contrast and Reduce Transparency strengthen controls and surfaces where needed.
- Differentiate Without Color adds a non-color velocity pattern to notes and the trim overview.
- VoiceOver exposes labelled controls and actions across core tasks, including library preview, playhead navigation, note editing, and Share Extension status announcements.
Accessibility work is ongoing, so this is not a claim that every screen is fully optimized for VoiceOver. If a task is blocked, use Report a problem and say which accessibility setting and screen you were using.
Recording
These set the defaults for new recordings; you can still change them per take on the Record screen:
- Click on by default — whether a fresh recording setup starts on Click or Free. Choosing either mode on the Record screen remembers that choice.
- Default BPM — the starting tempo for the click.
- Default beats per bar — 2 through 7.
- Click volume — how loud the click is, while recording and during playback in Groove and Export.
Playback
- Handedness — put the play button on the left or right of the screen, for one-handed use. In landscape, the Record screen mirrors to match, keeping the Record button under your chosen thumb.
Inference cache
When MemoToMIDI transcribes a take it caches the analysis, so reopening is instant. This section shows how much space the cache uses and offers a Clear Cache button. Clearing is safe — your recordings and edits are untouched — but the next time you open each recording it analyzes again (roughly 3–8 seconds per recording).
About
About shows the installed app version. Open Acknowledgments there for third-party notices and license text.
17. Tips & troubleshooting
Getting the cleanest transcription
A clean recording does most of the work. Detection only has the audio you give it, so a tidy performance in a quiet room transcribes far better than a noisy or hesitant one.
- One instrument, up close, quiet room. Record a single instrument with the mic near the source and as little background noise as you can manage. Overlapping instruments, room hum, and distant sound all muddy the result.
- Play cleanly and deliberately. Clear attacks and steady notes read more accurately than rushed or mumbled ones. A careful take beats a fast one.
- Set the right Mode. Mono for single-line parts (melody, bass, lead), Poly for chords.
- Tune up first with the built-in tuner — in-tune playing transcribes more accurately.
The first few takes will show you what it handles well and how Mode, Range, and Sensitivity change the result.
Common fixes
| If you see… | Try this |
|---|---|
| Notes you didn’t play | Switch to Mono (for single lines), lower Sensitivity, raise Min Length, or narrow the Range. |
| Missing quiet notes | Raise Sensitivity (Poly), or lower Min Length. |
| Low rumble or high “ghost” notes | Narrow the pitch Range to your instrument. |
| One long note that should be several | Turn on Onset Split and raise its Splits amount. |
| Loose timing | Give the take a tempo, then quantize in Groove. |
| Detection controls greyed out | You’ve made manual edits — tap Reset manual edits to unlock them. |
| Nothing detected at all | Make sure the audio is clearly pitched; percussive or very distorted sounds won’t transcribe. |
Reporting a problem (beta)
On the Export tab, tap Report a problem:
- Under What went wrong?, choose one or more tags — Missing notes, Extra notes, Wrong pitch, Timing, or Other.
- Add an optional note under Details.
- Tap Create report, then share the bundle with the developer.
The report includes the recording’s audio so the problem can be reproduced.
Getting help
Email contact@memotomidi.com. Include your device model, your iOS version, and — if a specific take went wrong — a problem report from the step above; it carries the audio needed to reproduce what you heard.
The app, this manual, and support are in English only. There is no other language version yet, and none is promised for a specific date; if that changes it will be announced rather than assumed.